Wednesday, November 16, 2011

How to install peel and stick tile

Hello all! Hope your week is going SWELL. ;) I figured it was high time I finally gave the toot on how I installed the peel and stick tile in the laundry room.

First of all, let me say…I LOVE THIS STUFF!!

It’s rockin’ my world. I’m SO pleased with it.

And now I’m going to tell you how totally easy it was to install. It’s just silly really.

The peel and stick we used was the Novalis tile from Lowe’s:

Novalis peel and stick

You can find it online here. It’s $2 and change for each 18 by 18 tile – so I covered the whole floor in our laundry room for less than $60.

First up I had to figure out how I wanted the pattern to go. I played around with it for awhile, just laying the tiles out to see how they would look. I didn’t want to to a standard pattern with straight lines for a couple reasons – one I wanted it to have more movement to it, and two, I didn’t want to have straight lines I could mess up. ;)

I ended up with a version of a brick pattern – because the room isn’t very wide, I changed it up a bit. I stacked each one off to the side of the other, measuring three inches to the side each time.

You can see how they ended up here:

Does that make sense? I hope!

When I needed to cut a piece, I measured the size I needed, then used a level to make the straight line:

I read that you should use a razor to score and cut the tiles, but I used what I had on hand and it was WAY easier:

My trusty Open It scissors:

image

I use this thing all. the. time. LOVE it. It cut the tile like buttah. :)

I found them much easier to use than trying to cut straight and deep enough with a razor blade.

Each tile has a subtle flow to the design, so you’ll want to use the arrows on the back to keep the tiles consistent:

It’s so subtle I doubt you’d be able to tell if they went the wrong way, but I stuck with it just in case.

This stuff is CRAZY sticky. I know…duh. But really, it’s crazy. :)

I would peel the backing off in big pieces, then use little bits of the backing to grab the edges:

That way I could hold on to it without gluing my fingers together compromising the sticky.

I did mess up my pattern once and freaked out a bit -- but it came up fine with some muscle. (I had just laid it down a few minutes before so I think that helped.)

The directions say to use a weighted roller over the installed tiles, or if you don’t have one, to use a rolling pin. I used a rolling pin over half of it and quickly realized the pin was leaving burnish-type marks all over the tile. It’s not a big deal cause no one would notice it but me, but for the rest I just used my hands and walked on it, focusing on the edges. I figured my weight would be sufficient. ;)

Overall the tiles went together flush and you couldn’t see between them, but in a few spots you could see the plywood floor:

Those few spots drove me batty. :) So I went back to Lowe’s and got the grout (it’s grout just for this vinyl tile). I started schmearing between the tiles and then noticed it wasn’t going well.

The grout is almost too wet – so it didn’t lay in the grout lines well after I wiped it all down with a sponge. The grout would stay in some places and completely come up in others. It looked AWFUL.

I wiped it all out from between the tiles, about to give up on it, and then realized there was a teeny bit left between the tiles that looked great after it dried:

grouting peel and stick vinyl tile

So I just started smooshing (like my technical terms?) the grout into the grooves with my finger. Then I used a rag to wipe it out, leaving the little bit at the bottom.

The pics above are the same spot before, during and after the grout. It finished it off beautifully!

Like I said, it’s holding up GREAT! A few weeks ago our humidifier in our HVAC system leaked everywhere (leaving lots of lovely water standing in the basement – yes, water is out to get us this year). The water got past the utility closet threshold to this flooring and as far as I can tell, it’s held up great. No buckling, no warping, nothing. I’m hoping the grout kept the water from getting underneath the tiles.

Best part is, if I do need to pull up one tile to replace it, I can. That is what I’m talkin’ about!

So there you go! Hope this all makes sense to those of you who are hoping to try this on your own! Lowe’s has a great selection of colors and designs, and the tiles come in 12 by 12 or this 18 by 18 size.

I love how real they look and how easy they are to clean!:

Now I just need to tackle every other surface in this room – after items 1-150 are completed on my list. ;)

Monday, November 14, 2011

One, two, three art caddy

Well HELLO! Hope you had a fantastic weekend! We finished up marching band season (for the most part – more on that soon!) and I am SO PROUD of my hubby, the staff and those kids. They are so crazy talented and they work their tails off all summer and fall.

But I am glad to have my hubby back – for a few weeks anyway. ;)

Over the past few weeks I’ve been working like a mad woman trying to get the office redo completed.

YEAH. That one. The one I started (early) last year. I’m so incredibly efficient, it’s just shocking. :)

My to-do list is dwindling though, and this project was so easy and fast! I just love how it turned out – couldn’t wait to show you!

It all started with my sister, and the Pottery Barn gift card she gave me for my birthday. She knows just what I love! (OK, she asked where I wanted a gift card and I told her Pottery Barn, but still. She’s awesome.)

I went to spend my free moolah (the best kind!) and of course…couldn’t find a THING. Gah – that is so frustrating! You walk in with a gift card and find nothing, and the next time you have two cents to your name and find EVERYTHING.

Can I get an AMEN?

:)

I went to another store at the fancy mall, then went back to PB – I was determined. I walked around so long the staff was giving me the stink eye.

Finally I found something I thought I could use:

It was filled with towels and I loved that, but we don’t have a great spot for it in our bathroom and besides that, I wanted to have it out where it would be seen.

The nice little surprise was that it ran up on major sale – I think I paid $30-something for it? Rock. on.

Anyhoo, I came up with a great use for it in the office! But the wood tone, although lovely, wasn’t doing much for it.

So I painted it. :) Oh yes. I did.

I started by spray priming it in my workshop spray paint station on a sheet on the floor in the garage:

At least I covered the snow blower. ;)

Then I finished it up with a coat of Rustoleum flat white:

 rustoleum flat white

Remember when spray painting:  shake the can really well before and during, use a mask or spray outside (or both!), and use small, short bursts – not big long ones. (DRIPS!) Oh, and numerous light coats are better than fewer thick coats!

I didn’t even sand it down, because the outside of it really won’t get much wear and tear. I did, however, use my sanding block to distress the edges up a bit:

I just sanded down parts that would show wear…if there was going to be wear. Which there won’t. But whatever:

destressing

I planned to use the caddy for the Bub’s markers and crayons and stuff, so I wanted to dress up the front with something kinda cute and fun.

I got the Silhouette machine out and cut number stencils out of vinyl and put them on the front of each shelf:

vinyl as stencil

If you’re real good you’ll measure them out and place them just right. I just eyeballed it and was real lucky they weren’t wonky. :)

I used the extra blue green color I had leftover from the book nook to paint in the letters, (I believe it’s called Lake from Valspar?) then took off the vinyl.

I LOVE how it turned out!:

pottery barn caddy

I loved the wood, but the white pops against the floors and the black dresser!:


And dang…it’s CUTE!!

The top shelf holds crayons, the middle is markers and the bottom is filled with paints:

It’s super easy for the Bub to get to everything and super easy for him to put everything away. (Ding! Ding! Ding!)

I love that blue color – it’s a perfect match to the Target lamps on the Craigslist dresser:

tall art caddy

And the whole thing was free (for me) – I used paint and spray paint I already had. Love when that happens!

One more project down – WHOOHOO!

The next time you see this room, it will be D.O.N.E. Geez Louise, that took forever. Anyone else taken 18 months do redo a space? No? Just me? :)

Friday, November 11, 2011

Giveaway Weekend!

Hey hey there! Well, I’m overwhelmed by the response to my last post – in a very good way. I’m so thrilled about all of your emails and thankful for the lovely comments. :)

I’m SO excited about this weekend’s giveaway! (I know, when am I not?) But reheheally…this one is right up my alley! You know I’m a tool girl so I was so tickled (pink) when Jessica wrote me about Tomboy Tools:

image

They sell everything any DIYer would need, but these tools are made specifically for the ladies. Pretty much everything is PINK!

I’m so hyped about this – if any of you are wanting to learn how to use tools, try your hand at more DIY projects, or just get some darn cute tools to replace some old ones, these are PERFECT for you.

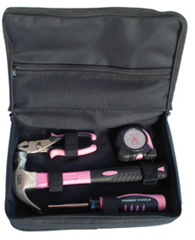
The basics kit has all the goodies you’ll need for most simple projects:

It includes a hammer, (multi-bit) screwdriver, tape measure and pliers – all on my top ten tools for the DIYer list!

And do you see the pink?? I’m dying. Best part about these – you’re hubby will never steal them. ;)

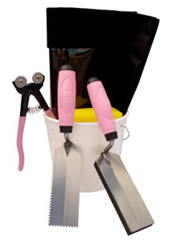
This kit is GENIUS – everything you’d need to tackle small mosaic-type tile projects!:

Perfect for the crafter or the DIYer!

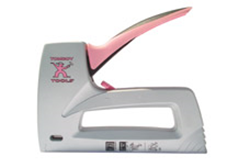
Another one of the tools I use a ton is a staple gun – mostly for upholstering headboards and seat cushions:

How fun is this? I am so thrilled with the concept of tools made specifically for women!

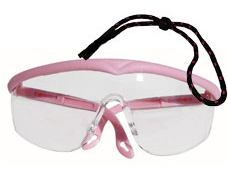
I love these safety glasses:

pink safetly glasses

Pretty much ALL of options at the hardware stores are…well…ugly. These are too cute and I’m totally getting a pair!

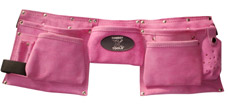
And if you thought the pink tools and glasses were fun, check out the tool belt:

pink tool belt

My Dad gave me one I use, but after seeing this I have the urge to dye it or hot glue rhinestones on it. ;)

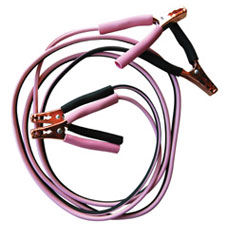
Tomboy Tools doesn’t just carry tools – they sell a great selection of garden tools, painting supplies and even items for your car, like PINK jumper cables:

They think of everything. :)

What a PERFECT holiday gift for the woman who has everything – or a daughter at school, maybe your Mom who wants to learn how to use tools. I just love it!

Tomboy Tools also sells their tools at home parties, which I think would be just about the best. party. ever. But you know me. I’m a little tool-obsessed. :)

Jessica with Tomboy Tools is offering a FANTASTIC prize for this weekend’s winner! I’m so excited for the lucky gal who wins the Tomboy Traveler:

It’s a canvas bag filled with a (magnetic – fancy!) hammer, tape measure, screwdriver, pliers, utility knife, level, gloves, safety glasses, sanding block and even a carpenter’s pencil. (A $80 value!)

Even if you aren’t a seasoned DIYer, you’ll fool them all with this one! And if you’ve been using tools forever like me, you’ll look cute doing it. :)

Here’s how to enter the Tomboy Tools giveaway:

1. Leave a comment here. Have you pulled out any Christmas decor yet? (Come on…I won’t tell a soul.)

2. Visit Jessica’s Tomboy Tools page here. Check out their products and come back here to let us know one that you’d love to try out.

3. Like Jessica’s page on Facebook here. Come back and leave another comment letting us know you did.

**You can enter using one method of entry or all – it’s up to you!

Remember if you comment anonymously or you have a private blog, please include your email address in each entry, and spell it out with “at” and “dot” to avoid any spammy emails coming your way.

This giveaway is only open to US residents only. It will be open till this Monday, November 14th (half way already?) at noon EST.

Hope you have a lovely, lovely weekend!

Thursday, November 10, 2011

Debt free: Nine months later

Dave and me!

Well, it’s been nine months since we paid off our last debt. (Which was the US Department of Education – my student loans. Not sure if I ever told you that!)

It certainly has been nine months of living like no one else, in more ways than one. I know so many of you are fighting the good fight against your own debt, and I wanted to follow up on our story and continue to give you the motivation to KEEP GOING.

It is so incredibly, amazingly worth it.

Many of you have asked what made us decide to finally attack our debt. (Which was $125,000. Yes. Three zeros. Six digits.)

I try to be as transparent as possible on this blog, especially when it comes to our debt story. But money is probably one of the most sensitive of topics, so I try to walk the line of what to share and what not to share.

I’ll tell you we were sick and tired of making a decent living and having absolutely NOTHING to show for it but wallets full of credit cards. It was just ridiculous and sad and depressing. Month after month, half of our money went to a credit card. Or a student loan. Or a car payment.

We had money leftover, but not a ton. So when we wanted something and couldn’t afford it – what did we do? Charge it.

It wasn’t crazy or extravagant. It was just little bits, here and there. It was breaking one of my own golden rules:

definition of maturity

I had first heard that quote in college and it stuck with me. I would recite it to myself often. Obviously not often enough. ;)

And one day, something clicked. We finally got serious about changing our lives.

Because we got MAD. Madder than hell.

We wanted to keep our money. We worked hard for it (who doesn’t?) and dang it, we were finally spitting mad about passing it out to them and them and THEM and them every month.

financial peace

That’s what it takes to make it happen. You need to get ANGRY at the debt. You need to want it out of your life so bad it’s all you think about, dream about, focus on. GET FURIOUS.

So we got mad. :) And we attacked it.

I’ve mentioned before we didn’t follow the “plan” to a T – we didn’t always go after the smallest debt first. We had some credit cards with just insanely high interest rates, so we went after those first.

We didn’t eat rice and beans. Well…sometimes at the Mexican restaurant. ;) We did still eat out and treat ourselves occasionally.

But we did follow the Dave Ramsey plan otherwise. No, it’s not rocket science. Ramsey himself will tell you that. But when you’re drowning in debt (and when you finally take the time to add it all up and realize how much you are drowning), you feel completely hopeless.

I’ve had a few really sucky days in my 36 years and the day we added it all up was one of the worst.

Dave Ramsey gives you the HOPE. He gets you amped UP. Crazy intense.

dave ramsey studio

(When I took this picture I was as giddy as a grown woman teenage girl waiting to meet NKOTB. I went to take Dave’s picture and right when I took this he waved. AT ME!!! I was all bouncy and hyper and texting all my girlfriends. For reals.)

It felt like we’d never get there…we worked at it for years. When we were getting to where we could feel the finish line, we decided to take Financial Peace University at our church.

I have to tell you – that class was one of the most amazing experiences we’ve ever had. It bonded my husband and I and made us even more excited and determined. There were moments when my husband would reach out and squeeze my hand and we were SO in this together.

This process changed our lives and it changed our marriage.

We finished paying off our debt two months after our last class. The 125,000 pound monkey was off our backs and it was surreal.

(This couple was there the day I met Dave – I had to take their picture because they had paid off something like $400,000. Talk about inspiring and emotional!)

It took a while for it to sink in. There are still moments when I realize we don’t have car payments. How stinkin’ weird is THAT?!

And yes…we’ve been able to do some things we would have never done before. Well – we may have done them. But we would’ve been paying them off for the next five years.

Let me tell you – sitting out on our patio at night sure is sweeter when it’s completely paid for and all ours. :)

But I think it’s important to mention all the ways we live like no one else – just in ways you wouldn’t think.

live like no one else

Our paid for cars aren’t fancy – not at all. Hubby’s car is nine years old with something like 210,000 miles on it. Mine is seven years old with 110,000 on it with a stupid amount of dings and dents. (I’m a magnet.)

We NEVER go on vacation. We go on some fantastic trips but they are ALL for hubby’s work. Always. Our last three trips to NYC have been business-related. Even our RV vacation this past summer was planned because of a work commitment – I don’t know if we would have done it otherwise. (Now that we have, we’re doing it again next year for sure!) Other than a few weekends to New York here and there, I don’t think in all the years I’ve been with my husband we’ve gone on one vacation together.

I hardly ever get my hair cut, nails done, new clothes. I got my nails done yesterday and I think the last time I did that was about the time we paid off our debt. ;)

I use a box to color my hair (completely necessary –- the greys are out of control), my hubby doesn’t treat himself EVER (I try to get him to, but he just doesn’t), and we don’t buy name brand…well, of pretty much anything.

But saying it’s all worth it is a complete understatement. We have started a new course for our marriage and our kids and our family tree.

When you’re considering giving up the cards, paying off your debt or are in the middle of it – you NEED to hear that it can happen. And you need to hear that’s it’s as peaceful as you think it is.

It is. All of the above. :)

One evening while in our Financial Peace class I turned to hubby and told him I needed to help someone else get there that wanted or needed to be there. (It was that powerful.)

I approached my new friends at Financial Peace Plaza and they agreed to help me out. ;) I’m paying it forward and want to provide some of you with the chance to go through the class. I’m giving away three Financial Peace packets and the wonderful folks with Dave Ramsey are throwing in two more of them.

You will get everything you’ll need in a box – and if you are able to attend the class, I WANT YOU TO GO. Sorry I’m yelling. :) The class is so worthwhile. (Go here to find one near you. I’ll either have the packet sent to you or pay for it through the church where you’ll attend – just let me know.)

If you don’t have a class nearby, you can go through it with the info and CDs in the packet.  Either way, we want to help five (individuals or couples) kick start your own peace.

I also have three new copies of the Total Money Makeover book – it’s the one that we got hooked on and it’s the one they recommend to anyone thinking about taking the plunge.

Because debt is a private issue, I’m not going to ask you to leave a comment here to “win.” ;) If you’d like a chance to attend Financial Peace free of charge, or if you’d like a copy of the book, just send me a quick email. I don’t need anything else from you other than a brief hello. (thriftydecorchick at gmail dot com)

Title it “DEBT FREE!” and just let me know if you’re interested in Financial Peace or the book. That’s it. I hate to put a deadline on something like this, but I want to get you going as soon as possible if you win, so let’s say I’ll take emails till next Thursday, the 17th.

Thanks again for your support and love throughout our journey – it has meant the world to us. Your encouragement and celebration made the process even more worthwhile. :)

**You can learn more about our debt story here. And read how awesome it is to be weird here.

**All pics are from last winter when I visited FPP with a bunch of bloggers. We had a blast!!

Wednesday, November 9, 2011

Farmhouse Industrial Modern?

Last year I told you about my Suburban style. “Real” decorators – especially those on TV –- seem to think “Suburban” is a bad word. I happen to think it’s lovely and warm and so ME.

Oh, the horrors! ;)

Over the past year or so, I’m drawn to different styles and feel like mine is changing a bit. I just have no clue what to call it now. I don’t know if it’s all the lovely blogs out there or just the natural ebb and flow of my decor taste, but things, they are a changin’. 

The other day I was looking around at some of my purchases over the past few months and they just showcase my decorating confusion. I thought I’d share a few of them with you. :)

I visited one of my favorite spots in Indy a couple of months ago – a salvage and architectural shop that I don’t think I’ve blogged about yet. (I will soon cause it’s amazing!)

We were in a bit of a hurry, (it’s the kind of place you need at least an hour to look through) but I did find this old crock:

antique crock

I’ve always been drawn to all things old and full of character. I absolutely LOVE it and the light blue “6” on the front. The price was crazy good too – only $20!

It sits next to the sofa and I fill it with blankets:

crock with blankets

Score one for the antiques! Or farmhouse style? Cottage? I have no idea.

For months and months I’ve been trying to figure out what to put on the wall to the left of our stairs. I can’t find a good picture of the scrolly iron thing that I had up there, but you can see a smidge of it here:

image

I’ve used those iron jobbies forever and a day to fill wall space, but I’m trying to move on and change it up a bit.

The iron piece was way too small for this wall anyway – but figuring out what to use instead was stumping me big time. I didn’t want a gallery wall, cause it would be too busy with the one on the stairs. I didn’t want to do a mirror, cause I have one over the foyer table. So what the heck else do you do?

Well…a find at a small town antique shop nearby solved that problem…at least for now:

antique windows on wall

(Yes. The Halloween mice are still out. I’m throwing in some spooky style into the mix.)

I found a few old antique windows, cleaned them up and hung them on the wall. I love the colors – they came in the white, blue and brown – perfect for our house! And I love how they fill up that large wall. I may do some adjusting but I’ve already got eleventy billion holes in that wall as it is.

Sooo…old stuff, two points.

Over the summer I found this little beauty at HomeGoods:

industrial stool

It’s the cutest little stool I ever did see! The grey color and metal legs lean more toward an industrial look, but the cute little number on the top is more farmhouse style:

number 1 stool

Half point industrial, half farmhouse. I’m so confused. ;)

Finally, I totally blame blogland for this one. My friend Chris made my multiple decor personalities issue even worse. She found a lovely table at World Market and I was smitten.

I was sitting in a waiting room when I read her post, and it just so happened I was about 50 yards from a World Market. Curses!!!

So I went. And I got it:

round modern table world market

(Yes. Those are seashells still on display. In November. I told you I’m all over the place.)

Dang her and her awesome taste!! I got it for a great price because I found a coupon online (they took it off my phone – hurrah!). You can find the table here.

I’m IN LOVE with it’s modern look – the shape, the design, the glass top. I swoon every time I walk by it. I’m still thinking about taking some Rub n Buff to it to change up the color a bit, but we’ll see about that.

Sooo…score one for modern style.

That leaves us with…uh. Major design confusion. ;)

I wouldn’t even call my home eclectic cause I when I hear eclectic I think funky – maybe I’m wrong? Who knows what’s going on in my head and house. All I know is I LIKE IT!

I love the different pieces throughout our home and that they change up the look up around here. I’m just more confused than ever on what to call my style.

Modern farmhouse industrial old stuff suburban? It’s got a certain ring to it.

Has blogland influenced your style? What would you call yours? I hope it’s easier than  mine. For your sake. ;)

Monday, November 7, 2011

November Before and After: New Knobs

Hey there! It’s time to party down at this month’s Before and After Party! Whoo HOO!
This month I’m sharing a really simple update I’ve talked about a few times – but it makes such a BIG difference (I think anyway).
Earlier this year I showed you the Craigslist dresser I got for the office:

I’ve purchased a few things from this Craigslist seller, and she always uses those basic wood knobs on all of her pieces. They were on the buffet in the foyer as well (before on left, after right):
image
You can see more about those glass knobs here.
Because I love the look of those on the black furniture so much, I decided to check out Hob Lob during the half off knobs week (the most magical week of the month baby!) last month.
They didn’t have the look I was going for, but I LOVE what I ended up with! First, I had to get those dang wood jobbies off – which isn’t as easy as it sounds. These are always stuck on GOOD – I think she puts them on immediately after painting, so they stick and end up curing on there.
To get them off, I used a razor to score around the knob, then hit a putty knife with a hammer to get them to pop off:
Of course you’ll want to unscrew them first. Cause if you forget that step, you may keep banging on the knob wondering WHY IN THE WORLD IT WON’T COME OFF:

Yeah.
No fear – if the new hardware will cover your little freak out, you’re good. ;)
hobby lobby hardware
The middle of the top drawer had smaller knobs, and of course those left the biggest mess when I took them off:
changing out knobs
Because I was installing smaller hardware there, I needed to fix them up a bit.
I just sanded them down and then used my own black paint to touch it all up. You can’t even tell:
white ceramic knobs
You can close up, but like always…anyone that would notice that would get a cookie. And no one has gotten a cookie yet. Well…they have, but not for noticing my imperfect projects. :)
So here’s a couple before and afters -- the blah wood knobs on the left and the new-but-look-old on the right:
  black dresser dark floors
I LOVE them against the black! The white ceramic looks fantastic with the white board and batten behind it. And they make opening the drawers SO much easier – they are much deeper so it’s easier to get a hold of them. Bonus!
Here’s a before shot of the whole dresser:

And the after!:
white knobs black dresser
Excuse the horrible night shot – the good photos may be lost forever because of daylight savings time. ;)
Alrighty – it’s time to see what you’ve been up to! I’m hoping to see some Christmas goodness here and there! I know you won’t disappoint! ;)
I would love it if you would link back to this post -- you’re welcome to include my beauty of a button as well:
tdc before and after
Have fun and link it up baby!