Showing posts with label linkies. Show all posts

Monday, November 7, 2011

Winners and Holiday Home!

Well hello there! Hope you had a lovely weekend!!

I need to announce a few lucky winners!

The winner of the Black and Decker Steam Mop is Natalie at The Bibler Family!

The two winners of The Rusted Chain giveaway are Lori at Itsy Bitsy Stitches and Veronika at Love Tuvster!

Congrats ladies! Please send me an email at thriftydecorchick (at) gmail (dot) com and I’ll get you connected with your goodies!

I also wanted to announce that my gal pals and I are baaaack with the Holiday Home Link Parties!:

image

I think I speak for all of us when I say this holiday series has become our favorite!!

I can’t wait to see what you all come up with!

Layla will kick it off with table decor ideas, Rhoda is up next with mantels, then Kate with holiday crafts and we’ll wrap it up with my annual Christmas tree partay!

image

Can’t WAIT!

For now, I’ll be back later this evening with the November Before and After Party!:

beforeAndAfterButton

See you then!

Wednesday, October 5, 2011

Fall Outdoor Spaces Party!

Hey there! It’s here! The final fall linky party in our Fall Extravaganza:

image

Layla, Rhoda and Kate and I have such a blast throwing these shindigs! I hope you have found some inspiration (and new visitors!) throughout the past couple of weeks.

My outdoor space started with a big change  -- yes, I painted our front door! I have to admit -- it was nerve-racking. I had been thinking of painting our door red for months, but was soooo sceered. I even mentioned it on Twitter one day and I tell you what, you all are a bunch of enablers.

And I love it! ;)

You were all, DO IT! You’ll love it!! Crack under our peer pressure!

And that I did. It just took me a while.

Our door was actually a greyish brown – but it always photographed blue:

Many of you have asked the paint color of my “blue” door! ;) The color matched our shutters and I’ve always loved it…I was just ready for a change.

I think your front door should make a statement, and I knew if I got the right color, a red door would look fantastic!

Well. It was definitely a lesson in picking out REDS. GoodNESS. It took three different colors. I wanted brick red – and the first “brick” color was orange. The second was pink.

But just like Goldilocks, the third was just right. :)

red front door

This is the color what I think of when I think of brick. Maybe it’s just me. ;) The color is called  Chocolate Cosmos and it’s from the Martha Stewart line at Home Depot.

(Although now it photographs purple – so I can’t win for losing!)

I changed out the hardware as well – our old set was seven years old and was showing it’s age. It was brass – which I actually didn’t mind because it wasn’t so shiny anymore. ;) But it was in sad, sad shape.

The ORB set is so sharp against the red!:

square fall wreath

I took down the light fixture and cleaned up the glass, then sprayed it in an oil rubbed bronze:

It’s AMAZING what some cleaning and spray paint does for…well, anything. :) You can go here to see how I transformed our coach lights the same way last year.

The red door is actually more of a reddish brown, which works PERFECTLY with our other brown accents:

cottage exterior fall

Because I cleaned up the front a few weeks ago, I was able to add a hay bale next to the porch for the first time ever:

hay bale fall

I’ve always wanted one – I was so giddy about that silly bale of hay! ;) Now that the landscaping bricks aren’t there anymore, it just fits.

We’ve been picking up pumpkins here and there over the past few weeks, and I piled them all on the hay. Most will go inside eventually, but I LOVE the big cluster of them, snuggled up with the mums.

I LOVE FALL!!!

(Have I mentioned that?)

I was going to put the mums in the pots, but I found Cinderella pumpkins for a steal at a local pumpkin patch. I’ve seen these for as much as $12 each this year! Craziness!!

I stacked them three high and they are so fun:

I love how the front has changed this fall – the landscaping, the door, the hay. ;)

Of course it isn’t fall around here without my corn stalks – I love how they cozy up our small front porch:

brick red door

(This pic is the true color of the door.)

Now I just need to decide if I’m putting the “Welcome” vinyl back! For now I like it simple – but we all know that could change fast.

The new color works perfectly with the colors in the window boxes:

fall window boxes

I would like to say I planned that, but no. It took three tries, remember? ;)

See that sweet smushy-face in the window? My heart!

I’ll show you more about installing the hardware and a how-to on painting the door in an upcoming post! One was way easier than I thought and one was way harder. (Five hundred points to the person who guesses the three-different-reds-door.)

Now I can’t wait to see your lovely outdoor spaces all decked out for fall! I know many of you may have shared your doors and porches at Rhoda’s door decor party last week, but feel free to link up again!

I would love it if you would copy and paste this cutie button into your post, or link back to this post in yours:

image

Thank you and have fun!!

Monday, September 5, 2011

September Before and After: A New Light

Well HEY! Hope you had a great weekend! We did a lot of bumming around and being productive – a little of both extremes. :)

Tonight’s before and after is brought to you by the continued science fair that is our kitchen. I showed you the mess the water damage has created, and last Friday, the madness continued.

We had noticed a few weeks ago that the framing around our back door was rotting away. We thought it would be a quick fix, and our handyman did too. That is until he started removing trim and found massive amounts of water damage – separate from the mess in the rest of the kitchen:

That’s a hole in our kitchen floor. For a brief moment in time we had a fabulous source of natural light in the basement. ;) I try to look at the bright side.

I told him to just tear out the floors cause they were going anyway -- thank GOODNESS we discovered this before replacing the floors!! (And no, there’s still no movement on that – hopefully this week.)

The folks who built our deck made it too high – so for six years the water has been flowing into the door frame every time it rained. That eventually ate away at the trim, the subfloor and the threshold.

Anyhoo, our awesome handyman worked from 8:30 a.m. to 6 p.m. and got it fixed up and did a few little changes that will keep this from happening again. LOVE HIM.

So…there’s been a little change I’ve been wanting to make to the kitchen for a while now, and this weekend I decided to do it. Because I needed to do something to the space that would make me feel in control again.

Or maybe I just wanted a pretty new light. Who knows. ;)

Recently something has been bugging me about light over the kitchen table:

oil rubbed bronze chandelier

I love it! But it felt too light…I don’t know, just not substantial enough. Once I realized what it was that was buggin’ me, I couldn’t get it out of my head. I just wanted something that was a bit more dramatic to fill that “space” in the room.

Enter the Portfolio light from Lowes:

portfolio light, lowes

I think it was $140? It was LUUURVE at first sight. I think I gasped just a bit when I saw it in the store, cause I knew it would look so good over our table.

I installed it the other night (with very little daylight to spare – I forget the sun sets so much earlier already!) and I couldn’t be happier with it:

pendant light, lowes

It adds a little contemporary flare to the space:

pendant light over kitchen table

I love it combined with our antique claw foot table. :)

I think what I love most is that it sends all of the light down to the table – it is SO much brighter under there now:

And of course I have it on a dimmer switch so it looks fab down low or up high. I love it!!

I thought about spraying it black for about two hot seconds, but I think we have enough black going on. (And at night it looks black anyway.) I’m working on some ways to bring some more color into this side of the kitchen, but for now, I love how this has changed it up a bit:

pendant light with drum shade

And look how calm our kitchen looks from this side (although you can see where I covered the torn out flooring by the door with the rug).

This side tells the real story of the past week:

mess

This is what happens when your pile spot (your island) is in the office. ;)

So here’s my before and after for this month –- the previous chandelier on the left, the new pendant on the right:

Typically your fixture should hang about 28 to 32 inches above your table and I always end up cutting my wires too short when I install. ALWAYS.  This one hangs 32 above the table, which I’m now happy about because any lower would have been directly in the eye line (for me anyway). As it is we can see under it well.

I found an old photo of the light after I installed it last year and it’s fun to see the changes since then:

Including the addition of a cute (rascally) dog. ;) And the removal of a floor. Gah.

So let’s see your projects! Link them UP!

I’d appreciate it GREATLY if you could link back to this post or at least my blog in your post. You can use this button if you’d like:beforeAndAfterButton

Monday, July 11, 2011

Before and After Party: Goodwill table

Well hello all! It’s time for another partaaaay!

I’ve got another project from the family room redo to share this time. When I was sure we were going to order the sectional, I started measuring out the space to see what was going to be able to stay and what would need to go. One thing that needed to scoot (to another room) was the long Goodwill coffee table I had moved into the space last year.

It was just too long with the sectional, so I was on the search for something that was smaller and a square shape. (If I had only kept our $10 coffee table I wouldn’t have had this problem!)

And I found a major score at Goodwill a few months ago when I found another table for $25! WHOO! It was the perfect size, the perfect shape and I LOVED the look:

IMG_5367

It was all worn and warm and lovely. :)

The only issues were that one of the hardware pieces was missing (it was one little piece – impossible to find) and it was a teensy bit too tall. I think it was meant to be a side table.

The legs on it were about four inches tall, so my first project was to cut down them down:

IMG_5370

Arrh arrrh arrrrrgh…just call me tool man Taylor. ;) Uhhhh…woman Taylor. Whatever.

Because I cut off about four inches it was at a good height, but there was a little somethin’ I wanted to add. I had fun adding bits of different styles into this space and wanted to give this table an industrial feel.

I found casters at my local True Value and knew just what I was going to do:

copper casters

They have a gorgeous copper finish – luuuurve!

They had a brassy tone as well that I quite liked (I know, HUH?):

brass casters

And a bunch of other options including locking casters, itty bitty ones and honkin’ ones:

imageimageimage

Because I cut four inches off the height, I could add a couple back and it was still going to be short enough to rest our feet. These were two inches tall and I just screwed them into the bottom of the table. (Make sure to get the screw-on type if you decide to try this – much easier to install!)

Then it was time to address the missing hardware. My True Value’s hardware aisle doesn’t disappoint:

hardware true value

Do you hear them? The birds singing? ;) I haven’t found a selection that compares anywhere.

I had to drill some some new holes to get them on, and that’s why I went with the pulls I did – so they would hide the previous (large) holes: coffee table on wheels

Did I mention all of the storage in this little baby? Those little drawers hold a TON of stuff. Perfect for remotes and notepads and pens and JUNK. Love it!

I didn’t get a great photo of the casters, sorry about that! You can see them a bit here:

coffee table on casters

I wasn’t sure how I would feel about using non locking casters, but now I’m really happy with them. The table doesn’t move when we put our feet on it, but we can easily move it around the room if needed.

You know, for when I need room to spread and take a nap work out.

Or something. 

This little Goodwill table fits perfectly in the space:

It’s not a huge transformation, but now it works for us and the casters change up the look just a tad. And it has all that storage, which is a huge bonus.

Here’s the before and after for this month:

IMG_5367

And the room with Goodwill coffee table number one (or two?):

And now with number three:

square coffee table

;) If Goodwill keeps taking the awesome coffee tables, I’ll keep finding them!

Now it’s time to see your before and after! I can’t wait!!

Remember to link up the html for your post, not your blog. Links to just your blog address will be deleted.

Please include a link to this post and this cutie button if you would!:

beforeAndAfterButton

(No, there’s no code. Still working on that. You should be able to copy and paste it though.)

I was one of the bloggers selected by True Value to work on the DIY Squad. I have been compensated for my time commitment to the program as well as my writing about my experience. I have also been compensated for the materials needed for my DIY project. However, my opinions are entirely my own and I have not been paid to publish positive comments.

Did you miss the Design Star giveaway winner? Check it out here.

Monday, June 6, 2011

Before and After Party: The Guest Room

Hey there! I hope you had a wonderful weekend! We had a great one…until a major DIY disaster hit. :) I’m smiling about it now (barely) but it’s taken a while for the twitching to stop.

I’ll show you more about that soon (you’ll understand why I’m holding off when I show you). GAH.

Anyhoo, a guest room redo has been on my radar for about two years now. Basically since stepdaughter went off to college.

It looked like this for years:

My stepdaughter picked out the design and colors and I said let’s go for it! Her and her girlfriends helped me paint it back when they were wee ones in middle school.

But now it’s more of a guest room, and I feel bad EVERY time we have someone come stay.

Pink, blue and purple doesn’t exactly scream come rest and relax in your home away from home. ;)

So I’ve been meaning to do this for so long, but I was waiting for inspiration to hit me. I kept picking out paint samples and swatches, but nothing felt right. I just didn’t know where I wanted to go with it.

I want a lush, comfy, hotel-feel, but still comfortable. I kept thinking a deep grey would look fab on the walls. I know grey is totally trendy right now, but I’ve had this little swatch of paint up for about 18 months:

IMG_5055

I’m so trendy I’m trendy after the trend hits. Yeah. Or maybe that makes me not trendy at all. Whatever. :)

Well, I just wasn’t feeling the greys I was picking out. So I decided to practice what I preach and wait for the inspiration to strike in the form of bedding or drapes.

I waited. And waited.

Waited some more.

Twiddled my thumbs.

Hummed a tune.

Crickets.

Then I kind of gave up. The pink and blue and purple needs to go and I was tired of waiting around. So I went with white bedding:


I found that lovely quilt set at TJ Maxx, and LOVED it. But it still needed something more…and the next trip into the Maxx delivered this beautiful duvet:

Ahhh, people! It had finally happened! (Just ignore the wrinkles.) Good. NESS. It took forever. But something had finally struck my fancy.

I wasn’t sure how it would look with the quilt, but I love it!:

tj maxx bedding

Ack! I just think it is gorgeous!

I pulled a deep grey out of the duvet for the sheet color:

grey green white bedding

But white sheets will work great too.

And I’ll be – look what was waiting for me on my NEXT trip into TJ Maxx:

Perfect!

I know it sounds like I frequent the place at least daily, but I don’t. Swear. Really.

(And no, all seven pillows won’t stay. At least I don’t think. I promise nothing.)

Just like that, the room was ready for a redo!

I’m back to my idea of the grey walls, but there are so many beautiful tones to pick from!:

ralph lauren grey colors   

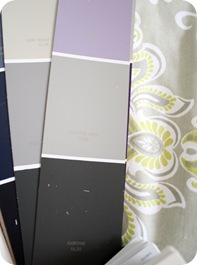
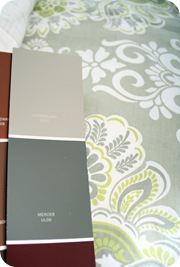
I’d like to pull one out of the bedding, but there’s two different tones of the grey. At first I was going darker because this room gets so much natural light, but now I’m leaning toward a lighter one.

Hmmmm…we will see, we will see! :)

You’ll notice I moved the bed:

I know it’s bad feng shui to have it situated like this, but over the past year or so, I’ve been using this room as my “sewing” room, since it has such great light.

And when I say “sewing” room, I really mean “iron and hemming tape” room – but more on that later. :)

Anyway, the end of the bed is my perch when I work on fabric projects, and I like the set up this way, but who knows if it will stay.

Other than painting, I plan on making a beautiful upholstered headboard, adding crown, painting the ceiling, adding some window treatments and painting the dresser that used to be in the Bub’s room:

I’d like to tackle that chair too, but we’ll just see how ambitious I am. :)

Now I need to figure out what to do with this big honkin’ checkered wall:

checkered wall

It won’t stay checkered, obviously.

But I did think it could be cool to keep with the same idea and do some molding along the lines of what I did in the playroom:

board and batten playroom

I have no idea what I’m doing yet – I’m sure I’ll see some ideas in my head the more I work the space!

Let’s hope. That’s the way it usually works anyway. :)

So that’s the short list folks – I’m just SO thrilled to have the biggest part done with the bedding. That’s the hardest part for me!

I shared how I (try) to start a room redo over at Beth’s place today – go check it out!:

I’ll be back with some fun projects – they were derailed by my DIY mishap this weekend but I’m persevering!! :)

OMG people – I totally forgot about the Before and After Party! My brain is missing, I swear. Well, this post kind of works, so let’s DO it!!

Here’s my before and after for this month:

A little underwhelming at this point…but it’s progress!!

Link it up!