Showing posts with label master bedroom. Show all posts

Monday, June 20, 2011

Master Bedroom Redo: Part Two

Hey hey!! Hope you had a wonderful weekend and a lovely Father’s Day. I finished up some changes to the master bedroom and I LOVE how it’s turning out.

Yes…the master bedroom. The one I started redoing almost a year ago? Remember that one?

I’ve told you before it takes me a while…and this room is no different. I’ve made some changes over the past few months and I’m SO happy with how it’s coming along!

You may remember last fall I was stuck with what to do over the bed. I tried sconces (loved). I tried drapes (didn’t love). I tried leaving the scrolly ironwork up (used to love but was over).

The sconces stayed, because we love them so. But there was still something that didn’t feel quite right.

A few weeks ago, it hit me. They were dark, the bed was dark, the ironwork was dark, the nightstands were dark. I needed to change something up.

So I changed the dark sconces with a bit ‘o spray paint:

I used the brushed nickel paint I used all over the Bub’s room and I LOVE how they turned out! It was just the pop I needed.

I took down the scrolly thingy and tried leaving the space between them empty, but it just felt weird. So I added a fun little sunburst mirror the folks at Wuslu.com sent me last year:

I’m slowly but surely adding a little glam to the space with some metallics here and there. I love the combo of the sconces and the mirror! (And yes, I was going to hide the sconce cords but I hung them on studs – no way to get the cord in the wall. I’m dealing.)

One little change that I think made a big difference was one I got from a reader – she mentioned she had taken the cross bars off the top of her bed and loved it. You can see ours here:

I took them off and feel like it opened it up and updated the look so much!:

I love when little things like that change up a space. It feels so different! I also cut the finials down a bit, so they weren’t so pointy and now they’re not as noticeable. ;)

You can also see in the pics above that I replaced the art that was above the old nightstands with larger mirrors. (Got them last year at HomeGoods.) I love the reflection of the light in the space, and the larger size works so much better with the new nightstands – which are just bookcases. (More on those soon!)

The frames on the mirrors have a silvery gold sheen to them that helps to lighten up the space too:

     calla lillies

Aren’t those calla lilies the most beautiful color you’ve ever seen? And isn’t the vase gorgeous?

I just bought it today. And the cat just broke it.

I can’t have anything nice.

Kidding! Not really.

The only other big change to the space is the chair:

buffalo check drapes

I’ve always had a $15 garage sale chair in there, but it was a bit small for our tushies. And not comfortable at all. (It’s in the guest room now. All of our guests have small tushies.)

The new chair was my debt free present to us both. ;) A few weeks after we paid off our last debt earlier this year, I headed out to HomeGoods searching for the perfect chair for our bedroom:

homegoods comfy chair

It was a bit of a science fair and I think I ended up bringing three chairs home that weekend. I loved this one, but wasn’t sure about it in our bedroom. Hubby LOVED it in there, so it stayed.

My husband doesn’t have strong feelings as far as the decor goes very often, so when he does, I try to go with it. This is his house too you know. ;)

I’m especially in love with the cutie little pillows on there:

placemat pillow

The furry cream one I found at Lowe’s – it was just the cover and I think it was only $7? I know furry doesn’t really scream summer, but oh my…it is SO soft! I love it!!

The other pillow was actually a placemat I found for $4 at Cost Plus World Market. I stuffed it like I did these and then tufted it with a couple of buttons (one on both sides).

I just used a long needle and went back and forth through the pillow about a zillion times. I’m hoping the buttons stay put but we’ll see about that. My sewing skills are not my strong suit. ;)

It’s shaping up nicely…in the past year I’ve changed a LOT in the room (the before):image

There’s still so much I want to do though – I so want to paint our ceiling! The wall above the fireplace is just begging me to cover it with molding. (Do you hear it? I do.) And there’s a dresser we’ve had forever that I still need to paint. Can’t wait to show you that one -- it was a steal from Craig and his List!

Even though it’s taken me eons, we’re loving the changes so far! It’s so warm and comfy and still a bit sophisticated (we think anyway):

target bedding rust

That black ball of fluff on the bed is a cat by the way. Not the pretty vase-breaker cat, another one. One who doesn’t break my stuff. :)

OH, and one more little change that I think made a big difference? I changed out the white fitted sheet that was over the box springs for a chocolate brown one so it blends into the bed – I LOVE it! I was going to make a bed skirt, but I’m so happy with how it looks I’m not going to.

For now. My mind could change. It would take me year to make it anyway. :)’

**The duvet was from Target last year, the bench was from HomeGoods last year as well. I’ve seen some similar to it still though!

For more on the master bedroom redo, click here for all of the posts.

Monday, April 4, 2011

Before and After Party: A favorite!

Hello all! It’s time for the next Before and After Party! Whoot! This time I’m showing you an oldie (it’s been done for a few years now) but it’s one of my very, very favorite transformations in our house. LOVE.

We have a fireplace in our bedroom, and yes, it’s fanfreakingtastic. Really. It was all hubby’s idea. The day we decided to add it in to our house plans, I was huddled in a corner, biting my nails, shaking, freaking out about the added expense.

But yet again…he was so right. I end up saying that way more often than I’d like.

We LOVED the mantel and surround on the fireplace -- it was nice and beefy:

fireplace peach tile

I just don’t know what I was thinking with that tile. It was peach:

Because my father-in-law was a tile extraordinaire, we asked for his help to redo it and make it more us. Cause peach isn’t us.

He and his assistant did SUCH a fantastic job, I love it so much still. My original plan was to do glass mosaic glass tiles – and then I priced out the glass tiles I wanted, and whoosh, it was going to be crazy expensive (like $600) to do this small space.

Plan B: Lowe’s. :)

I found a perfect alternative for only $10 a square foot:

It’s a mix of greens, rusts, browns and greys and I’m telling you, it’s SO gorgeous. Oh, I love it so!

Because you can cut the sheet the tiles lay on before installing, we only ended up needing about eight 12 by 12 sheets of tile.

For the hearth, it got even better. I found slate tiles for just over $2 each:

slate hearth

Oh the colors are luscious, and they match the mosaic tiles perfectly.

So the total cost for this project was just over $100 for tile. SCORE! (And a few bucks more for the grout.)

My father-in-law took the old tile off before reinstalling the new stuff – and it wasn’t as hard as I thought it would be. I was nervous about that part, but it came off so easily, they were able to use the old board for the new tile.

One thing to consider when using slate – each tile will vary in thickness, so be careful when installing. If you look close, you can see how the tiles toward the front are thicker than those in the back:

You don’t notice it unless you’re looking at it a certain way:

uneven slate tiles

But if you use this on a floor, it’s something you’ll want to watch.

We also sealed the tile after everything was installed (you need to wait a certain amount of time before doing so, check the instructions) – I absolutely recommend doing this because it really brings out the colors in the tile and makes them even more deep and beautiful!

The last step -- those (BLINDING!) brass bars. They came right off – if you have them check to see if yours pop off. They are held on with magnets on the back:

You’ll just have the black fireplace behind it, so you can just take them off and leave it at that. We thought the bars made the fireplace look just a bit more finished, so I just spray painted them with oil-rubbed bronze paint:

brass on fireplace

Even though the bars get hot, the spray paint has held up great! I thought I’d have to use a high heat paint, but the ORB works just fine. It’s held up for years now.

And now we have a fireplace that is just our style, and it’s one of our favorite before and afters:

mosaic tile on fireplace

You can see I also changed out the light and you can see more about that here. The art above the fireplace is made from canvases and wallpaper and you can see that here.

It’s an oldie but goodie but I love it so much I figured it was worth mentioning again.  :)

Our fireplace before:

And after my thrifty tile shopping and my father-in-law’s mad skills:

And the wide before shot:

And the after, with a plethora of Where’s Waldo changes:

:)

So it’s time to see your projects! Can’t wait to see!

Remember, be sure to link the html to your post, not your blog! The linky will be open for a week, so if your post isn’t ready, you can always link up later.

I would appreciate if you could link back to my site and include this purdy button:

beforeAndAfterButton

Have fun!! :)

And GOOOOOO BUTLER BULLDOGS!!!

Tuesday, November 9, 2010

Tricky Tricky! (Window treatments)

Howdy! I still haven’t heard from two of the winners of the HomeGoods cards -- Cammy and Stephanie, holla at me!

So, remember when I showed you the start of our bedroom redo a couple of months ago? Remember the purple drapes?:

rust and chocolate bedding

Oh my. They were looking pretty sad.

They were left over from the room before…and before. :) But obviously it was time for them to go. Then one of my lovely readers, Missy, told me about some drapes online at JCPenney – they were beautiful, they were the rust color I wanted, they had long lengths, they were reversible, aaaand they were only $12.99 each!

Ding! Ding! Ding! SCORE.

I was sold! I love the look of really full drapes, so I got the 95” length and got four panels. I was thrilled when I got them and they were the perfect color! I showed you the drapes in this post, when I was trying to figure out the area above the bed:

Yes, I think I know what I’m doing now…but no I’m not ready to show it just yet. :) Evil, I know.  :)

So anyhoo, I knew the plain rust side was a bit much, so I was planning to add a touch of cream to pull in the colors from the new bedding. My original thought was to trim them out with a thick band of grosgrain ribbon. Or maybe even use cream fabric paint.

But that’s a LOT of ribbon for four 95” panels. And the paint idea just sounded like a headache waiting to happen. (Taping off straight lines for miles – thanks but no thanks.)

I mentioned the drapes are reversible – the back side was a beautiful buffalo check print. When I hung the drapes the night we got them, I held up the check side and hubs and I both though they may read a bit too country for our taste.

But the other day I turned them around, just to see…and oh. my. I was in LURVE. I also left the rust side on the other end of the window for a good week, just to make sure my love was real.

It was. I was hooked on the check. :)

(I showed you a peek last week in my “Mom Cave” post.)

It’s slightly shimmery, it’s got the dark rust, a lighter rust, and it’s got the cream I was looking for all this time. AND it was there in front of us all along. I love when it works out for FREE.

When it comes to hanging my drapes, there’s a few things I do that I get asked about a lot -- the first is what I do to make them look pleated. I learned this little trick from a fellow decorator I used to work with…and it right up there with the top three window treatment tips ever. (In my itty bitty opinion.)

It’s good peeps. Really good. :)

Custom made drapes (or any nice treatments) are made with drapery hooks – and the hooks are used to hang them. They give the fabric a full, pleated, custom look when hung and look like this:

I’ve made all of the treatments in our home, (up till now!). I rarely sew them (I’m a hemming tape and iron kind of girl) and when I do sew I can barely do a straight line -- so doing something like the hooks is way over my head. I tried it once and let’s just say it just didn’t go well…at all. :)

The little trick I learned doesn’t need these dodads -- all you need are your rings with hooks. Instead of clipping your drapery rings to the top of the window treatment, or putting the rod through the top of the drapes…pull your fabric up, pinch it in sections and clip the back of the fabric from behind:

Like so:

You’ll notice I used two different types of rings – half of them were $1.99 at the thrift store, but I needed more to get the full look I was going for. They didn’t have to match cause you can’t even see them! 

See? Tricky tricky! ;)

I like to clip each side of the treatment, then the middle, then do the rest in (fairly) equal sections:

pleated drapes It does not have to be perfect. At least in our house.

The end result really depends on the fabric – this fabric is perfect! It’s just stiff enough to keep the pleats standing up, even though I have them clipped a good five inches down from the top.

Every once and a while (like every six months) I need to poof them up, but otherwise it works GREAT:

If you have a thinner fabric, you can still do this, but you’ll have to clip much higher on the fabric. Does that make sense? Otherwise you’ll have floppy pleats. And no one likes floppy pleats. :)

The result is a very custom look, without the custom price (or work!):

short drapery rods

I do this with ALL of our drapes and absolutely love the look!

My second little trick is my short rods. I get a lot of questions on where to buy the short rods I use.

Well…you can’t. At least I haven’t found them -- that’s why I DIY my own. :)

Most of our drapes aren’t operational – we don’t close them for privacy because we have the roman shades. Because of that, I prefer not to use a long rod across the window. It’s just a personal thing – I don’t mind the look at all, but it can get costly to get a rod long enough to go the width of a double window.

So I just cut them myself – if it’s a wood rod, like in our family room:

family room

I just use my miter box or saw to cut a long rod down to the size I want:

Then use a drill bit to add a new hole at the ends for the finials. That’s it!

I love doing this because it makes your drapes seem fuller than they are, and you can use a cheaper rod (maybe four feet?) and cut that down, instead of a huge six or eight foot one.

For metal rods, I use a tool you can find in the plumbing department:


I think it’s about $8? You just put the pole in, tighten, and turn it so the tool can cut it. It takes a few minutes, but it’s easy!

Of course, you’ll need two sets of finials and brackets, so sometimes that can override the whole saving money on the rod thing.  ;)

(Drats.)

Have I mentioned I LOVE my new-but-not-really drapes?:

buffalo check curtains

You’ll notice in the pics above that the window is really close to the wall to the left…it seems the architects don’t consider our window treatments when building our homes! How could they NOT? Helloooo…it’s right up there with support beams and insulation and all the important stuff!

When I have a window that butts up against a wall like that, I just skip the finial. I didn’t use them at all in the Bub’s room:

window

I promise no one will notice. And if they do, give them a cookie. :)

So here’s one more shot (are you tired of seeing this spot yet?!) with our buffalo check drapes, DIY rods and pleats:

And the kitty was trying to get in every. single. shot. So here you go:

fluffy butt

:)

JCPenney’s still has the drapes for sale! Even the 108” length is only $12.99 a panel. That’s crazy good! I could not even begin to make reversible, lined drapes that length for that amount. LURVE!!

The only color left is the terra cotta color, except in the longest length, and they have a bronze/pearl combo as well in that one. That color looks lovely as well. Check them out here!

I don’t think they look country at all now – just traditional. And loverly. Me likey.

P.S. Are you singing this in your head yet?

That’s right on time it’s trickaaaaaaaaaay…

I love the 90’s.

Wednesday, November 3, 2010

HomeGoods Mom Cave (Giveaway!)

Oooooh…I’ve been so excited about this one! I have a FAB giveaway for you today -- I’ve been chomping at the bit to tell you about!

HomeGoods has a Mom Cave promotion going on right now that you may have heard about around blogland. I don’t care who you are…young, old, work outside or in the home, one child or seven, children or notevery woman needs a spot they can go and just relax. Recharge. Regroup. Cause we make our worlds go round. We do – you are the glue in your household.

And being the glue gets tiring. :)

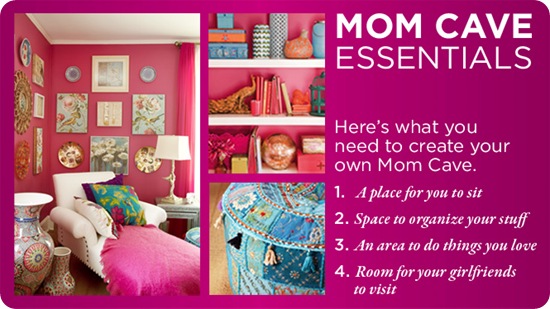
HomeGoods worked with the talented interior designer Elaine Griffin to come up with four essentials of the Mom Cave:

mom-cave-essentials Sounds good to me! Love it!

Thanks to HomeGoods, I was able to work on my own itty bitty Mom Cave. If you haven’t been to HomeGoods (or TJMaxx) – you. must. go. If you live near one, it is your duty as an American to check out the deals!! At least that's the platform I would run on…

You’ll find just what you were looking for and just the thing you didn’t know you were looking for.

You know I adore their lamps:

See all those drum shades? Swoon. The most expensive lamp I’ve ever purchased there was $50, but most are $30 each. For the selection, quality and the fact that they come with a shade – it’s hard to beat those prices. Lamps are pretty affordable most places, but adding on that shade is what gets ya.

There’s aisle after aisle (after aisle) of mirrors and art:

And there’s always a TON of furniture. I saw these two upholstered headboards the day I was there and thought they were lovely:


If you’ve been to HomeGoods, you know that doesn’t even scratch the surface. If you’ve never been but hear us bloggers go on and on (and on) about HomeGoods, you know that doesn’t even scratch the surface. ;)

We have a little spot in our master bedroom that has turned into my own little Mom Cave over the years, and this is what it looked like for a long time:

Ahhhhhh…the shiny brass is blinding me!!!!

Sorry…I couldn’t resist. :)

I thought this spot could use some warming up, and I started with the table. I’d pulled that one from the basement forever ago, and because it’s meant to be an end table, it stuck out really far from the wall. I wanted to cozy it up a bit, so I searched for just the right table at HomeGoods…I found plenty, most in the $150-$200 range. I didn’t want to spend that much and figured I wasn’t going to find what I was looking for.

But then I saw this one…and the birds started singing:

Really…there was a bird in the store. It started singing.

I KID. I KID!!

The singing was in my head. :) I’ve been wanting to pull some metallic tones into the room and this is a lovely muted gold -- the metal has almost a faux bamboo look, and the top is a mirror.

It was exactly what I envisioned for the space…AND it was only $60! Score!

One of the reasons I love HG so (we’re tight, so I can call them HG) is their selection of look-a-likes from more expensive stores. If you stalk browse Pottery Barn catalogs like me, you may have seen this pretty clock:

Well, at $39 it’s just a teensy out of my comfort zone for a little clock…but HomeGoods had a lovely version (I think it’s even bigger than the PB one?) for $15:

And dare I say – I like this one even better?

If I had my way and a few extra hundred bucks a month, I’d have fresh flowers all over our house at all times. But I don’t so I don’t, but I hope to treat myself as often as I can here:

They smell ahhhmazing! Oh, and the “vase” is really a sundae glass. :) Isn’t it so cute as a vase? Love it!

For the past few months, I’ve found myself sitting in this spot every morning to put on my makeup, so I added a box I already had (it was supposed to be a jewelry box) and put my everyday makeup in it:

Since the table had empty space underneath, I found a beautiful storage box at HomeGoods to hide magazines:

It was $16 and I love the hint of gold metallic on it – ties in perfectly with the table!

I initially tried the old lamp on the table, but I was still running into the same issue I’ve had – the light was just too low to read by (or to put make up on). So I stole a floor lamp from the office and it’s the absolute perfect height:

IMG_1282

I think floor lamps are so hard to pick out -- I find most are way too tall. This one happens to be just the right height for this chair. I found the drum shade a few months ago at Goodwill and it looks great on this lamp. (Love that natural fabric!)

No Mom Cave is complete (at least in my world) without a spot to cuddle up. I grabbed a luscious blanket for $13 at HG:

Seriously -- $13?! You can’t beat it!

It looks lovely on my little $15 garage sale chair and clearanced pillow I already had:
IMG_1274

That chair is the one and only upholstered item I’ve ever bought second hand. I couldn’t get it out of my head when I saw it…and went back three times. The third time it came home with me. :)

Then it was on to the mantel…yes, we have a fireplace in our bedroom. No, we are not rich. Yes, it ROCKS. No, the fireplace was not my idea. When we built our house and sat down with the designer to pick out all of our “extras,” I was in full freak-out, hyperventilating mode by the time we got to the bedroom and hubs announced he wanted a FIREPLACE.

You have got to be kidding. I think I passed out for a few seconds…the dollar signs were giving my hives. But hubby talked me into it…and I am SO GLAD he did. It’s only a few dollars more a month on the mortgage anyway…right Dave Ramsey? RIGHT?!  :) (Don’t hate Dave…we’re paying it off with your guidance!)

Anyhoo, I wanted to keep the mantel simple, but also make it a bit more sophisticated. I took a platter we’ve had for years and tried it up there and loved it. LURVE. Then I found three candlesticks in various sizes at HomeGoods to give some height to the other side:


Those candles are totally fake by the way. No catching the art on fiyah. (You can see how I made the DIY art (with wallpaper!) here.)

I wanted to beef up my little photo wall a bit, so I got a couple more black frames, one for $8 and one for $6:

The photos are printed right off our computer onto plain computer paper. (No, I don’t even use photo paper most of the time!) I keep scraps of foam board and cardboard and use them for photo “mats” – I cut them to size, paint them the color of the wall and just center the printed photo on top.

El cheapo art. Photographs are 90 percent of the “art” in our house and that’s just how I like it. :)

The little mirror was a Goodwill find a while ago, and I had been using it as a tray till  now. The wall needed one more little something and it was perfect!

So my little corner of the world, that used to look like this:

Is now just a tad bit warmer and cozier with the addition of some metallics, some soft stuff and a couple more photos on the wall:

my mom cave

(I’m trying out the buffalo check side of the drapes by the way – not sure if it’s staying or not, but ooohweee, I love that print!!)

Of course, in my world, the “Mom Cave” is still surrounded by toys (that I pushed out of the picture) and my pile-o-crap in the corner:

But let’s focus on the relaxing part, shall we??:

Until tomorrow when there’s a cat sleeping in my chair, choo choo’s all over the table and fire trucks lined up on the floor. But I wouldn’t want my Mom Cave any other way. :)

So I have some AWESOME news for you Squeeeezies! I have FOUR $50 HomeGoods gift cards to give away! WHOOHOO! I told you this rocked. I did.

All you have to do is leave a comment. What would you use $50 for? A space for just you I hope! Cause you DESERVE IT! I don’t know you and really have no idea…but I’m going to guess you totally deserve it. ;)

(This giveaway will be open till Monday, the 8th at noon.)

**Disclaimer:  My love and gushiness of HomeGoods, their prices and their products is all my own. They do not ask me to tell you how much I love them. I just do. So I tell you. That is all.