Showing posts with label solutions. Show all posts

Sunday, September 18, 2011

Last Minute Landscaping

window boxes

Heya!! How was your weekend? Good I hope – the temps were pretty darn great around here and I took advantage of it!

All of the activity we have going on in the backyard has kind of spilled over into the rest of the yard – but not in a good way. Our front and side yards have looked like the back for the past month or so – AWFUL.

With all the workers walking all over and all the STUFF everywhere and dust and dead grass and moving furniture off the deck and back on and off again – it’s not been pretty around here. So we kind of gave up on the front too.

Hubby is a fareeek about our yard too – so that tells you what a mess everything has been. We just figured we’d wait till everything was done to make the outside presentable again.

Well, the back is thisclose to done, so this weekend, I attacked the thorn in my side in the front.

Shortly after we moved in to our house, I installed landscaping bricks along the front of the house:

azaleas

I also tore out all the plants and put in the azaleas and lilies. Didn’t they look great?

Then, as time went on, the plants got bigger – the lilies looked GREAT, and the azaleas did awesome too:

And check out those petunias – wowza! :)

For a few years, it looked great! But lately I’ve noticed something every time I pull up to the house. It just looked MESSY.

A hot mess to be exact:

Numerous issues were going on – (most) of our azaleas are out of control. Which is great, but a couple of them are HUGE. They’ve at least tripled their size since I planted them. Nice problem to have, I know. ;)

But the lilies are being completely choked out. You can see how big and beautiful they were before. Now they just looked like weeds coming out between the azaleas.

Speaking of weeds – I’ve just ignored them lately. The landscaping is so tight behind those bricks that I can’t even get in there to get the yucky stuff out. We have a HUGE problem with critters dropping Mulberry tree seeds – so we have random trees popping up EVERYWHERE.

(You can see one coming up behind the azalea above.)

It drives me mad. Cuckoo.

And add to that, if hubby didn’t use the weed wacker every single time he mowed, the grass just looked like booty up against the bricks.

So I thunk and I thunk and tried to figure out what to do. And I decided to take the bricks out.

I had one of those “is this allowed?” moments I sometimes have with myself – I mean, I worked my tail off installing that brick (years ago). And it took me forever to get them all level (years ago). And they weren’t cheap (years ago).

So I felt like I had to keep them there, which is just silly.

But I don’t. So they’re gone. :)

It took a while, it took some muscle. It took some weeding. MUCH weeding.

And in the end, it was different, but a good different:

landscape lighting

I still have some work to do – it needs more mulch, I need to cut into the lawn around it to keep the mulch in and clean up the line a bit, and after a good rain I’ll actually be able to get the landscaping lights down into the ground. Our soil is solid. Gah.

Eventually I want to run beds around our little sidewalk and down along the driveway and add more perennials. But for now, just clearing it out and adding a ton of mulch made a HUGE difference.

I feel like our house can breathe!

Originally I was going to just reinstall the landscaping bricks around the mulch, but goodness, those are so much work to get right and level. And I want to tie in this area with the rest of the front yard, so the bricks just won’t work anymore.

What’s especially awesome about this small change is that the landscaping lights were hidden behind the plants before, and now we have LIGHT! Over time, you couldn’t even see the spot lights on the house because the plants got so big. And it was a BEAR to get behind there to change out the teeny light bulbs in those things too.

I got a couple more lights to add to what we had, and now it’s even brighter out front.

I LOVE landscaping lighting by the way. It adds so much beauty to your house at night. And it makes it look more expensive – I swear. If you don’t believe me, drive through the fancy neighborhoods at night and check out the amazing difference landscaping lights make! ;)

And they are just so easy to install too – I just luuurve em.

While I was at it, I tore out the dead flowers from the window boxes and planted my kale and mums:

cottage style shutters  kale and mum window boxes 

I think kale is such a beautiful option for fall – they hold up great in cool temps, they are unusual and just pretty.

I throw in a few (fake) pumpkins this time of year to fill in the empty spots, and I love how it looks. The first signs of fall are showing around here! YAHOO!!

I’d like to add extend the beds even further next year, move the lilies out a bit so they can breathe, then add some annual color along the front. But going into the fall, I’m just loving the power of simplifying:

cottage style exterior

Next up – mums in the porch planters and some front porch changes! Ohhh…I’m so nervous. ;) Can you guess what I have up my sleeve?!

Are you working on any last minute landscaping? The weather is PERFECT for it and fall is great time to plant trees and bushes! I am so motivated, I’m moving on to another overgrown spot this week.

And I hope to show you the backyard this week too – once we clean it up! :)

Monday, September 12, 2011

DIY or DI-Buy?

Hey hey! How was your weekend?! We had a great one!

I worked on a project I’ve been wanting to try for awhile now. Our backyard redo is finally finishing up this week…and it’s been a long time coming. :) The landscaper and his team have done an incredible job and stayed right on track, but we’ve had many, MANY issues with the deck and staining it (which I’ll tell you about soon) and it’s pushed things back quite a bit.

I’m hoping I can show you the deck (finished) and the patio (finished) later this week or early next. Of course now that I say that, some random, freakish storms will come through and push it all back again…but I’ve come to expect that. ;)

Anyhoo…the patio is mostly done, and the outdoor fireplace is DONE and it ROCKS OUR WORLD! I’ve been trying to find a coffee table to place in front of the fireplace – we have some chairs set up around it and I knew a table in the middle would be the perfect set up.

So I went to a bajillion stores and of course…nothin. It’s September, after all. That’s like trying to find Christmas decorations in August. Well…wait. Not really. Cause that you can find.

But anyway, it’s impossible.

So I decided to make one. Our landscaper had plenty of pallets so I decided to recreate this project:

image(source)

I’m digging the slightly rustic, industrial look right now, and I love that it was large and in charge and it rolled. I’m obsessed with things that roll right now too, if you couldn’t tell.

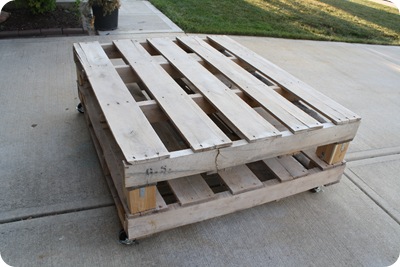
So I got two pallets (free):

pallet

Then cut down 4 x 4’s to the height I wanted (four inches) for the legs:

I turned the top pallet over, as you can see. I attached the legs with brackets:

I attached the bottom part of the bracket first (onto the pallet), then put the leg in and then attached the sides of the legs.

Then, I turned it over and put it on top of the second pallet to make the table.

Because I couldn’t attach the bottom part of the brackets the same way I did before, I would line up the legs, place the brackets where they went, and then prop up the top part of the table while I screwed in the brackets:

Does that make sense? I did that for all four legs, then placed them all back into their brackets, and then attached the brackets into the legs.

Are you with me? ;)

Then, because I was trying to use what I had, I found some honkin’ washers from my stash to attach the casters:

casters on

I had to use the washers because the holes on the wheels were too large. The washers are ridiculously large and look goofy so it’s a good thing they won’t be seen. :)

I sanded it down to prepare it for a dark stain:

pallet coffee table

Annnnnnnnd…I didn’t like it. OK, not really. I mean, it looks fantastic. I love it – it just wasn’t going to be right for the patio.

I kept standing there trying to convince myself that it would work, but I just knew it wasn’t the look I wanted. It has some rough edges and is way dirty (underneath) – which I was OK with because it was going to stay outside. But I didn’t want to worry about the Bub playing around it either.

And it was just a tad too rustic for me.

Then the most important little detail came to me – uhhh…the table is wood. The fireplace has fiyah. Fire and wood – not a good combo. I mean, the fire isn’t shooting out, but the occasional ember will, and I don’t want to have to worry about that.

Why do I think of these things AFTER I spend an hour on a project?

So…it was on to plan B.

On a total whim I called a Menards about 30 miles away to see if they had more of the set we had already purchased (on clearance) a few weeks ago. None of the stores around us had any pieces left…but this location did. I couldn’t believe it!

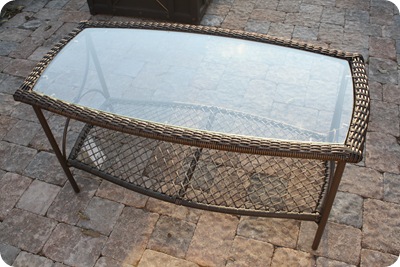
I got a great little coffee table for $50-something and it matches our furniture exactly:

menards coffee table

Usually I’m not a “buy the whole set” kind of girl, but in the second week of September, I’m not pushing my luck. I bought that baby up FAST.

But one little issue was bugging me – it was too tall. Too high coffee tables are one of my biggest pet peeves. They are right up there with parking lots that don’t connect – HATE THAT.

Seriously…hate. it. Aren’t you glad you’re not me?? :)

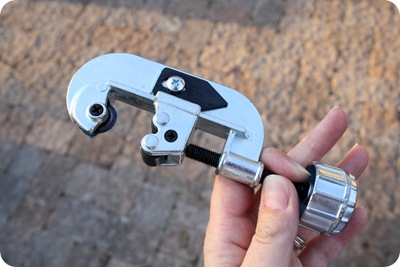
So I decided to take care of that myself. I cut down the legs with my plumbing tool:

pipe cutting tool

I showed you how I use this baby to cut down my curtain rods here. It works like a breeze!

First I took the little feet off the table legs:

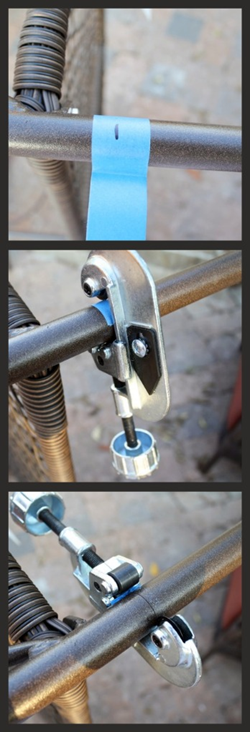
Then I measured five inches from the bottom and marked the measurement. I usually put some blue painters tape around the metal so I can clearly see where my mark is:

cutting metal rods

You just tighten the cutter around the metal and then turn it around and around – with every rotation, tighten it just a tad, and after a few rotations, you’ll get this:

A perfectly clean cut! It’s SO easy!

I pushed the little feet back in:

And now we have a much lower (it was 22 inches high, now it’s 17) outdoor coffee table:

I love it! It’s perfect! I find lower tables make a space feel much more intimate. And you can put your feet up on them much easier. That’s the main thing. ;)

Here’s a sneak peek of the patio – it’s SO awesome, I can’t wait to show you!:

(The Bub had set up a picnic for us. Sweetie pie!)

So…that was my long road to a table for the patio. The good thing – both projects were easy and super fast. The pallet table took less than an hour to put together, and the coffee table adjustment took about ten minutes.

And now I have a pallet table for sale! Ha! No, for real -- if any of you local Indy folks are interested, let me know. If not, I’ll take it apart and use the parts for a later project. :)

Have you started something that ended up all wrong? How did you fix it? Trash it? Walk away? Is it still sitting there? ;) Sometimes store bought is just right -- even if you do have to make a few little adjustments to it!

I will show you the whole space SOON!

Wednesday, July 27, 2011

Pinterest hits and misses

Hey hey! Sorry for the delay with this post – I was too busy screaming like 15-year-old at the NKOTBSB concert last night to get this up. :) OMG…it was SO. GOOD. Sooooo good. More on that later.

I’ve told you before of my love for Pinterest – and I haven’t fallen out of love yet. :) It’s easily the best way I’ve found to organize fun stuff online.

The only problem? I’ve found about 40 bazillion ideas I want to implement. Seriously a bazillion.

Some of my favorite pins are helpful little tips. Things that make your life easier, idea for organizing, things that make you say, well DUH, why didn’t I think of that?

One of my latest favorites is this how to fold a fitted sheet tutorial:

how to fold a fitted sheet

(source)

Halleluiah!! Do you know how long I’ve been trying to figure out the elusive fitted sheet? I’ve even watched videos and couldn’t figure it out.

I’m pretty quick. :)

I caught on to this one right away – today I successfully folded two fitted sheets and they look pretty spectacular, if I do say so.

I thought this idea was bahhhrilliant – using a tension rod to hold cleaning bottles under the sink:

(source)

Um…this did not work for me. It didn’t stay up for long. I went in the next day to get a bottle and everything had crashed down. Awesomesauce.

I may try this one again and get the tension rod really, super tight. I think that might help.

This little snack station for the fridge was definitely a DUH moment:

snack portions for fridge

(source)

Putting the snacks in portions, out in the open in the fridge…so simple, but I had never thought of it.

I did it the other night, and it’s been four days and I haven’t grabbed a bag of chips once. That’s saying a lot too – I lurve me some chips! Because the good, fresh stuff isn’t hidden away in the drawers, I’m grabbing fruit, carrots and cheese.

I know – duh, right? But it works.

I thought this next idea was super fun:

bubble refill station

(source)

How cute!!

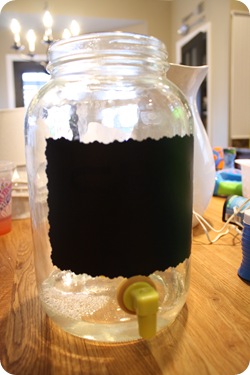
A couple of months ago, I found an old sun tea jar at Goodwill, and I knew I could make it work for this project. I covered the front with my black vinyl like I did our cereal jars:


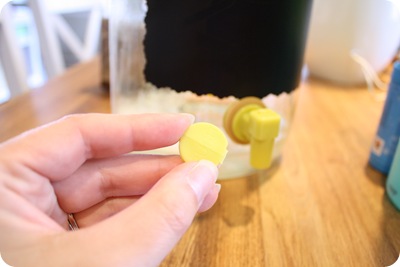
I was planning on using chalk to label it. I started filling it with our bubbles and then went to see how it was working:

IMG_6054

I pulled instead of pushed. Oops. :) Drats.

Since it’s no-spend July, I don’t have anything else that will work. The more I thought about it, the more I knew I’d want something with a handle on the top anyway. A big jug of bubble solution won’t be light, and a handle would help.

We’ll see if I tackle this again…next summer maybe?

Here’s another duh one – using heat to get price tags off of items:

(source)

Goodwill tags are the WORST – I used my hair dryer on a couple Goodwill items and it worked like a charm.

It’s not super convenient to grab a hair dryer, I know. But if you’ve got a sticker that’s good and stuck, or a bunch of items, I think it’s a great idea. I bought a bunch of these pretties from Target in May:

image

And the dryer made quick work of getting those tags off. I usually use Goo Gone, but it’s such a mess. This worked great!

Of course, if you’re on Pinterest for two hot seconds, you’ll come across a scrumptious recipe you must. make. now.

Just look at this:

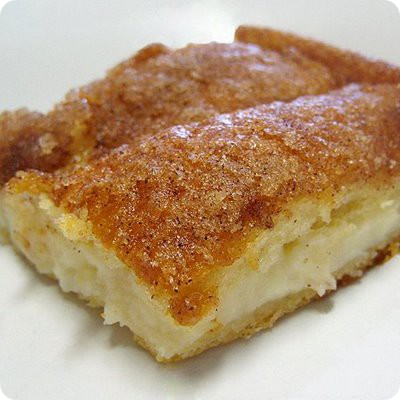
sopapilla cheesecake

(source)

OH. my. word. Just look at it.

Go ahead. I’ll wait.

Hungry? :)

It’s basically crescent roll dough, cream cheese and sugar. Easy, right?

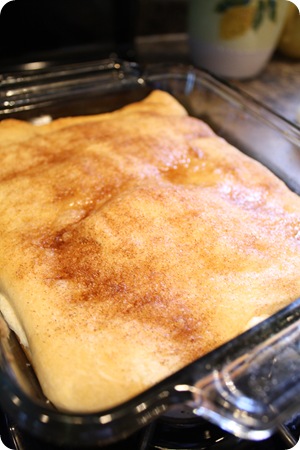
I made it the other morning (I halfed it) and was SO excited:

It was as I was pulling it out of the oven that I realized I forgot to mix in a very important ingredient – the sugar.

I thought it may be OK without it…but um, no. Without the sugar mixed in to the cream cheese, it just tasted like crescent rolls, with cream cheese, with cinnamon sugar on top. Dur.

Good, but not scrumptious. :) This I will try again though. Oh yes…I will. Tomorrow. Or maybe tonight.

Got any helpful tips that didn’t go the way you thought they would? Or some that work great? Anything I can’t go one more day without knowing? Do share…so I can “pin” it! ;)

Thursday, March 24, 2011

Stuff I like

Hey all! Thanks so much for the all the sweet comments on the board and batten in the office! I haven’t touched it since I finished – my shoulders still cry out for mercy every time I step in the room. :)

Every once in a while, I’ll find a new little doodad or product, and if I like it, I’ll think – “This (insert cool thing here) is so nifty, I need to tell my Squeezies about it!”

I think about you often, I do. ;)

But one little cool doodad does not make a post, so I thought I would show you a few of them all at once. Some of these we’ve been using for years, some just a few weeks.

First up, some super saahhhweet organization from my pal, your pal, everybody’s pal -- IKEA. I picked up these on a recent trip and love LOVE them:

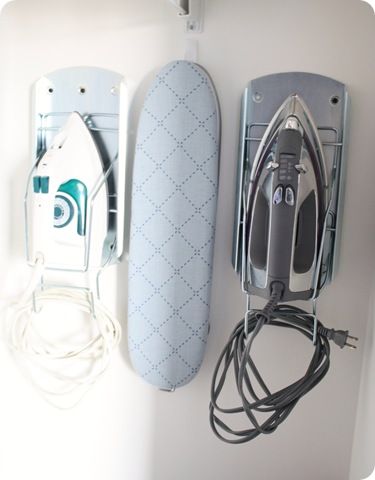
iron storage

They hold your iron on the wall, all tucked away nice and organized. I know, it’s the little things. It doesn’t take much. I’m easy to please. I told you, IKEA makes me happy. :)

I think they were $3.99 each. The mini ironing board (for shirt sleeves) I hung with a Command hook (love those too).

I got two holders for our two irons – one is for hubby’s work clothes, and one for my drapery projects. I use hemming tape and there were some unfortunate hemming-tape-residue-on-the-work-pants incidents. So now we have his and hers irons. His is the manly dark one, mine is the dainty light one. So cute.

And did you notice the little cord holders? Um, that put me over the edge happy, cause you know cords give me the heebs.

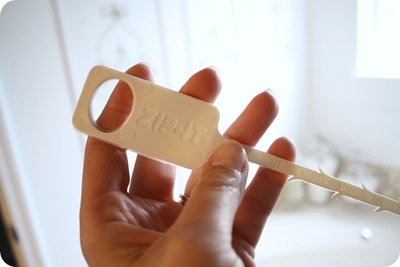
Next up, a knock your head against the wall cause I WHY didn’t I think of this, the Zip-It:

zip it

Oh my glorious, this thing ROCKS. I love this little $2 jobbie – you just put it down your drain and pull up. All the nasty comes up with it. You’ll thank me for not showing you – I’ll let you experience that for yourself.

I found it forever ago, and I’m never going back to the nasty chemicals to unclog our drains. I have this thing about Drano. It freaks me OUT. Every time I’d use it, I’d turn on all the fans, open every window, close the doors behind me, and leave the house for three days.

A little bit of an exaggeration, but not much. :) I don’t remember where I got our Zip It, but I’ve seen them at Target, and you can find out more at their website here. (If you have a weak stomach, do not watch the video on their site. For reals.)

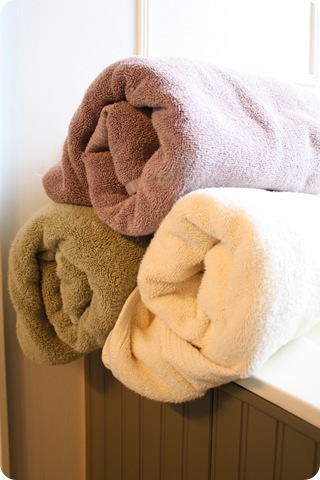
A couple of years ago, we found the BEST, fluffiest, softest, more absorbent towels EVER. And we found them at Meijer of all places.

I am gaga over these towels:

I kid you not, I adore them. They are hands down the best towels we’ve ever owned. We’ve spent good money on much more expensive brands and these beat them in price, quality and comfort any day of the week and twice on Sunday.

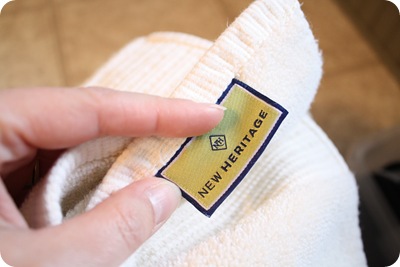
They’re called New Heritage, and I believe the large towel is $9.99:

new heritage towels

I’m not kidding you – they are luscious. I’ve washed them meeellions of times and they hold up amazingly well. They’re softer than the day we bought them, they don’t snag, and they get you dry.

We love them so much, we got rid of all of our older towels and only use these now. They come in about seven colors I think, but no white, which is kind of a bummer.

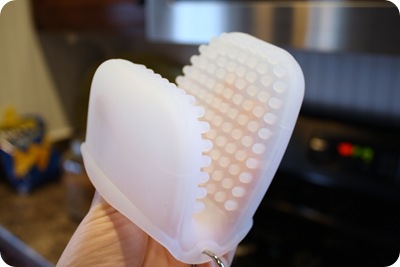
The last of my cool stuff is for the kitchen. I found these oven mitts at Crate and Barrel last year:

crate and barrel silicone mitt

I got my first one with a gift card (they are $9.99), and loved it so much I went back for another. Eventually I got rid of all of my other oven mitts, they are that great. They’re grippy enough that they hold on tight to pans, they wash so easily (I rinse them or put them in the dishwasher) and they take up so little storage space.

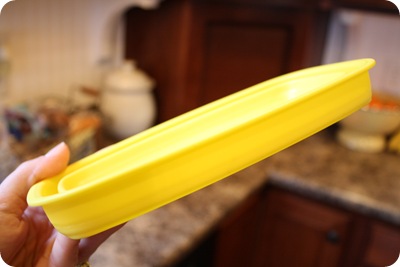
Speaking of silicone (this stuff is amazing, eh?) I found this little strainer ($5.99 I think?) at TJMaxx last summer:

Doesn’t look like a strainer huh?

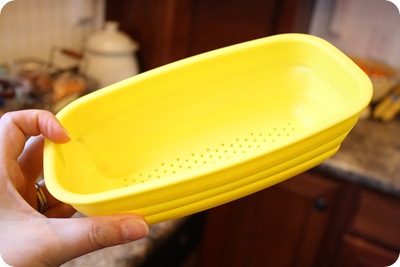
BOOM:

It pops out. I don’t know why, but this thing gets me all giddy. Ingenious.

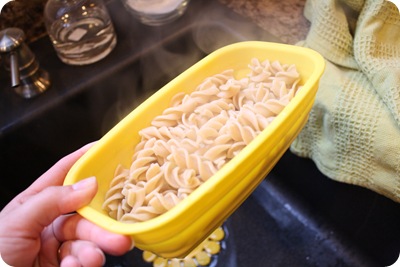
This one is pretty small, and it still hold a good amount:

pop out strainer

It washes so easily, and takes up a sliver of storage space in the drawer. I’m on the lookout for slightly larger versions as well.

I guess they make storage containers like this too now. The brilliance out there astounds me. Again, WHY doesn’t my brain think of this stuff? Don’t you love how you see something like this and you’re all DUH…but you would never think of it?

At least my head doesn’t. :)

So there. you. go. My favorites doodads of late. Nuggets of awesome. Good stuff. Stuff I like. Anything you’ve found lately that you love? Trinkets, tools, stuff that works? I love hearing about things that work and hold up for moms and families.

P.S. I’m not getting paid by any of these companies, I just like their stuff. So I share. Cause they rock.

P.P.S. If you can find the bag of Cool Ranch Doritos in a picture above, you get a gold star.

Friday, February 4, 2011

Work what ya got

headerWell hello!! I got a fun little project accomplished yesterday that I absolutely LOVE. :)

It started with some house envy, believe it or not. :) Yes, even I see beautiful homes in blogland and sometimes that little green monster starts rearing it’s head. You all know I LOVE our house, so it’s not a big monster, mind you -- just a little one.

I just love little corners, niches, interesting spots in homes, and I adore how some people use awkward spots to their full potential. Like hallways – I just love a long hallway with hardwood floors, a beautiful runner and woodwork as far as the eye can see. Add a gallery of family photos and I’m swooning.

I have a recurring dream about a house we buy and are fixing up, and in each dream I find a new little nook or a tiny room I didn’t know was there before. I LOVE that dream. :)

But alas, we have no nooks, no niches. Not even a hallway. Not one hallway in our entire house. That’s the new open concept for ya – plenty of open spaces (which we love), but sometimes I do crave a little nook.

About a month ago or so, I realized we a needed a storage solution for our son’s dress up stuff. Now, not dress up like princess dresses. Manly dress up like policemen, train conductors and firemen.

(Insert Tim the Tool Man Taylor grunt here.)

So I thunk and I thunk, and I thought of the closest thing to a hallway we have – the half wall in our playroom/loft:

half wall

And the idea hit me. I knew exactly what I wanted to do!

First step was to paint the wall out in semi-gloss white:

Didn’t he do a great job?:

I kid! I kid! No child labor here folks.

Mostly because he wasn’t doing it right.

I kid! Not really.

OK, onward! You’ll notice I didn’t even paint the edges of the wall. I didn’t need to because it was going to be covered up with my next step. I took primed mdf from Lowe’s and started installing my vision:

IMG_2926

I took some video to give some more detail, but it’s so straightforward – boards across the top, bottom and sides. Then I did some measuring to figure out the spacing between the rest of the boards.

The math went like this – the space between the two outside boards was almost exactly six feet. So I took:

6 feet x 12 (for inches) = 72 inches

The boards were 3.5 inches wide, so I figured out how many sections I wanted (five) and knew that would take four additional pieces of mdf:

3.5 (mdf boards) x 4 = 14 inches

Take the 72 inches minus 14 and you get 58 inches.

Divide 58 inches by the five sections I wanted, and you get 11.6 sections between each vertical board.

Does that make sense? Math and I are not friends, and I swear it’s easy. Once you do it one time, it’ll make more sense for the next time. :) I use that method for any spot where I’m adding molding to a specific amount of space (and I want it to look uniform.)

I took a quick video to show you a couple of my other tricks:


Sooo…anyhoo, after a couple more coats of paint on the mdf, some caulk (remember, it’s your BFF folks!), and hooks – I got this:

board and batten

Isn’t it gorgeous? I mean, really. I want it all. over. my. house. ALL OVER. It’s just classic and pretty and yummy.

I can’t believe how happy woodwork makes me. It’s just ridiculous.

Now we have a spot for all of the make believe outfits:

board and batten storage

I almost hated to cover it all up, but it’s for the sake of my sanity. Those hats have been laying around here and there for months because I haven’t found a good spot for them.

I especially love how it ties into the mdf I added to the staircase last year:

And you smarties will notice that NO, I have not painted that railing yet. Only the bottom section is done:

That is how I roll. :)

I just love how it turned out! I took an empty wall that wasn’t doing anything:

half wall

And made it functional and pretty:

Gotta love that!

The wood was el cheapo – I think I spent $15 on the mdf. I got the ORB hooks at Lowe’s as well. Love, love, LOVE!

Now I’m so pumped to get moving on the board and batten in the office! My plan is to get started on that this weekend.

Have a GREAT one!