Showing posts with label tool school. Show all posts

Sunday, October 16, 2011

My Top Ten Tools

Hey all! How are ya? Hope you had a wonderful weekend my peeps!

We stayed with my sis this weekend cause the FLOORS ARE DONE!

I was pleasantly surprised late late week when our flooring guy said he would work through the weekend to get them finished up.

To say I’m thrilled is the understatement of the century. :) Hopefully by the end of the day tomorrow the baseboards will be painted, the quarter round will be installed and our furniture will be moved back in! After that I will share many pics, don’t you worry.

I’m just smitten.

I still need to clean the entire house. ;) The dust was WAY better than we expected – we actually had more dust with the removal of the old floors and the install then we did the sanding. Crazy! But everything is just covered – I have a ton of cleaning ahead of me but I couldn’t be happier about it. :)

Anyhoo, I’m so excited to show you and will do so ASAP!

During the flooring madness this week, I did some reorganizing (I tend to do that when I feel like things are out of my control). I moved my tools from the basement to a couple different spots – mainly because the top of our basement stairs is ALWAYS piled high:

I told you about my piling problem here. It has not been cured quite yet. I feel it may be a lifelong affliction. ;)

Because I’m in perpetual project mode around here, and because immediately after I’m in project mode, I’m in l.a.z.y. mode – the tools sit at the top of the of the stairs forever and a DAY.

MANY days. (Plural. Times ten. Plus infinity.)

I could just be less lazy and walk them down the stairs to put them away, but no. I told you I’m a piler.

So I moved some of the tools to the cabinets in the garage:

And some to the Craigslist dresser in the foyer:

Odd place for the tools, I know. But I’ve had a few in there for  a while now and it’s worked out great. I didn’t use that space for much else, so it’s now filled with gadgets and painting stuff. I LOVE IT.

While moving everything, I came across quite a few tools I know I couldn’t live without and I thought it was high time I shared my top ten tool list with you. These aren’t heavy duty power tools – just the basics. But they are the basics I use almost daily.

With these you can hang pictures (straight), install a light fixture, do some minor fixes around the house or even install molding on your walls.

In no particular order (because I can’t play favorites with my precious tools), here is my go-to list…

1. Screwdriver set.

There are two types of screwdrivers, and all you really need for the most basic of projects is a Phillips and a flathead:

image image

(source)

You can see by those pics that the Phillips has a “star” kind of shape to it, and the flathead is…well…flat. ;)

You’ll want a variety of sizes of both – but to get by, one of each will do. The Phillips version is for the most basic screws, and the flathead isn’t used quite as much. At least I don’t use it often – but it’s useful for the screws you find on outlet covers and the such. (Yes, I just said “and the such.” Wordsmith, I tell ya.)

The flathead is also good for opening paint cans. ;)

2. Hammer and nail set.

OK, talk about basic. If you don’t have a hammer, well – HOW DO YOU SURVIVE???

Kidding. (Sort of.)

The hammer is pretty self explanatory. The nail set is a must have for anyone who wants to try their hand at installing molding:

nail set

When you install trim by hand (with a hammer and nails – which I used to do!) you’ll want to use this to get the nails deep in the wood, so you can cover them with putty.

Even when I use the nail gun, I have to pull out my nail set pretty much every time:

image

(No, not my hairy arm. Source here.)

Sometimes the nails just don’t go in quite right and this helps to drive them in. (Especially when they hit a stud and they won’t budge with the hammer!)

3. Tape measure.

Again, a basic:

But go for the good one when you get one. I like the longer lengths – they come in 12 or 25 feet (or higher), and I’d always go for the 25 feet. You think you’ll never need it that long…and then you do. ;)

And I love the ones that you can pull out and they stay put. The most basic tape measures retract unless you lock them manually. My faves lock by themselves, and then retract when you push a button.

And if you’re like me…you’ll lose them like you lose socks. For real…I’ve probably purchased 25 tape measures in the past five years. I have absolutely no clue where they go.

It drives me a teensy bit crazy. I have visions of them all hiding away, snickering at me every time I need one.

4.  Level.

I use a level ALL THE TIME. I use it when installing board and batten, beadboard or wainscoting. I use it when I hang pretty much anything, even curtain rods. I have a two foot level:

But they come in a ton of sizes. I also have a small one (about five inches) that I use for little projects, and a teensy one (about a inch wide), for checking pictures and art for level. I couldn’t live without them!

OK, I totally could, but everything hanging in our house would be wonky if I had to.

They tell you if something is straight across or straight up and down, based on the bubble:

(source)

When it’s right in the middle like that, you’re golden. ;)

5. Pry bar.

If you are going to remove baseboards, this is your tool:

crow bar

Our baseboards are CRAZY hard to get off the walls, and I couldn’t do it without this one.

I used the pry bar when I pulled up the laminate in our laundry room a couple weeks ago – you can get it into tight spaces by tapping an end with a hammer and wedging it underneath. It’s the power you need to deconstruct. FUN!

6. Wire cutter.

This one is a must have if you plan to change out a light fixture:

wire cutter

Which, by the way, isn’t hard – at all. I know it’s intimidating, but the basics of changing out a light are very simple. Someday I’ll do a post about it. When I can find a third hand to take pictures. ;)

This tool can cut through all kinds of tough stuff – I use it on much more than wires.

7. Miter box and hand saw.

This little box has transformed my home:

miter box with saw

(source)

This and a hammer and nails or glue is all you need to install molding throughout your home. For years this is all I used. With thicker wood it can be a workout, but it’s certainly doable.

You can do mitered (angled) cuts with it – it sets up the perfect angle for you. Listen carefully -- you do NOT need a compound miter saw and nail gun to install molding! It just takes a little more time and muscle with the miter box and hand saw. But muscles are good for you. ;)

8. Wrench set.

These come in handy all the time as well – when you need them it’s hard to find something else that will work just right:wrench set

(source)

Of course they are helpful for tightening things – but mostly use them when I’m trying to pry something apart or put it back together. So with wrenches, I recommend having at least two – they usually come in a set like you see here.

Finally, my two biggies! Hold on to your seats. It’s exciting. WHOO!!

9. Drill bits. and 10. Drill.

Told  you –- crazy exciting!

Drill bits are used in the drill, and I explained about the different types of bits here:

drill bits

For the most projects you’ll just need a basic drill bit set. It will drill holes into drywall and wood easily. I seem to use my bits and drill at least once a week, if not more.

I explained more about the differences between cordless and plug in drills in that post as well. I have both, but nine times out of ten, I use my cordless drill:

image

It’s all you need most of the time. I only pull out the cordless when I’m drilling holes or screwing into something really thick, like a door or dense wood. The cordless is just easy to use – no need to worry about an outlet or extension cord when you need it.

So there. you. go. My top ten tools for any DIYer – beginner or otherwise! With the screwdriver and wire cutter, you can change out a light or install a dimmer switch. With the miter box and hand saw you can make your own vintage-looking trough thing. And with the pry bar and a wrench, you can rip the carpet and tack strips off your stairs. ;)

So did I miss any must have tools? Is there one you can’t live without? I’ll do a post on the bad boys (the power tools) sometime soon – they deserve their own individual posts. They are just that cool. :)

P.S. You can see some of my other tool-related posts here:
TDC_toolSchoolButton

I’ll be back soon with some flooring pics!! Have a wonderful Monday!

Monday, September 12, 2011

DIY or DI-Buy?

Hey hey! How was your weekend?! We had a great one!

I worked on a project I’ve been wanting to try for awhile now. Our backyard redo is finally finishing up this week…and it’s been a long time coming. :) The landscaper and his team have done an incredible job and stayed right on track, but we’ve had many, MANY issues with the deck and staining it (which I’ll tell you about soon) and it’s pushed things back quite a bit.

I’m hoping I can show you the deck (finished) and the patio (finished) later this week or early next. Of course now that I say that, some random, freakish storms will come through and push it all back again…but I’ve come to expect that. ;)

Anyhoo…the patio is mostly done, and the outdoor fireplace is DONE and it ROCKS OUR WORLD! I’ve been trying to find a coffee table to place in front of the fireplace – we have some chairs set up around it and I knew a table in the middle would be the perfect set up.

So I went to a bajillion stores and of course…nothin. It’s September, after all. That’s like trying to find Christmas decorations in August. Well…wait. Not really. Cause that you can find.

But anyway, it’s impossible.

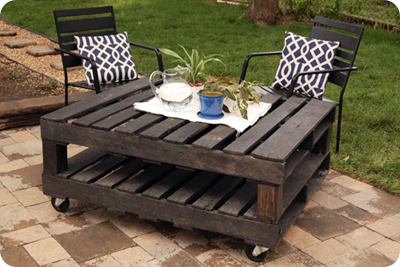
So I decided to make one. Our landscaper had plenty of pallets so I decided to recreate this project:

image(source)

I’m digging the slightly rustic, industrial look right now, and I love that it was large and in charge and it rolled. I’m obsessed with things that roll right now too, if you couldn’t tell.

So I got two pallets (free):

pallet

Then cut down 4 x 4’s to the height I wanted (four inches) for the legs:

I turned the top pallet over, as you can see. I attached the legs with brackets:

I attached the bottom part of the bracket first (onto the pallet), then put the leg in and then attached the sides of the legs.

Then, I turned it over and put it on top of the second pallet to make the table.

Because I couldn’t attach the bottom part of the brackets the same way I did before, I would line up the legs, place the brackets where they went, and then prop up the top part of the table while I screwed in the brackets:

Does that make sense? I did that for all four legs, then placed them all back into their brackets, and then attached the brackets into the legs.

Are you with me? ;)

Then, because I was trying to use what I had, I found some honkin’ washers from my stash to attach the casters:

casters on

I had to use the washers because the holes on the wheels were too large. The washers are ridiculously large and look goofy so it’s a good thing they won’t be seen. :)

I sanded it down to prepare it for a dark stain:

pallet coffee table

Annnnnnnnd…I didn’t like it. OK, not really. I mean, it looks fantastic. I love it – it just wasn’t going to be right for the patio.

I kept standing there trying to convince myself that it would work, but I just knew it wasn’t the look I wanted. It has some rough edges and is way dirty (underneath) – which I was OK with because it was going to stay outside. But I didn’t want to worry about the Bub playing around it either.

And it was just a tad too rustic for me.

Then the most important little detail came to me – uhhh…the table is wood. The fireplace has fiyah. Fire and wood – not a good combo. I mean, the fire isn’t shooting out, but the occasional ember will, and I don’t want to have to worry about that.

Why do I think of these things AFTER I spend an hour on a project?

So…it was on to plan B.

On a total whim I called a Menards about 30 miles away to see if they had more of the set we had already purchased (on clearance) a few weeks ago. None of the stores around us had any pieces left…but this location did. I couldn’t believe it!

I got a great little coffee table for $50-something and it matches our furniture exactly:

menards coffee table

Usually I’m not a “buy the whole set” kind of girl, but in the second week of September, I’m not pushing my luck. I bought that baby up FAST.

But one little issue was bugging me – it was too tall. Too high coffee tables are one of my biggest pet peeves. They are right up there with parking lots that don’t connect – HATE THAT.

Seriously…hate. it. Aren’t you glad you’re not me?? :)

So I decided to take care of that myself. I cut down the legs with my plumbing tool:

pipe cutting tool

I showed you how I use this baby to cut down my curtain rods here. It works like a breeze!

First I took the little feet off the table legs:

Then I measured five inches from the bottom and marked the measurement. I usually put some blue painters tape around the metal so I can clearly see where my mark is:

cutting metal rods

You just tighten the cutter around the metal and then turn it around and around – with every rotation, tighten it just a tad, and after a few rotations, you’ll get this:

A perfectly clean cut! It’s SO easy!

I pushed the little feet back in:

And now we have a much lower (it was 22 inches high, now it’s 17) outdoor coffee table:

I love it! It’s perfect! I find lower tables make a space feel much more intimate. And you can put your feet up on them much easier. That’s the main thing. ;)

Here’s a sneak peek of the patio – it’s SO awesome, I can’t wait to show you!:

(The Bub had set up a picnic for us. Sweetie pie!)

So…that was my long road to a table for the patio. The good thing – both projects were easy and super fast. The pallet table took less than an hour to put together, and the coffee table adjustment took about ten minutes.

And now I have a pallet table for sale! Ha! No, for real -- if any of you local Indy folks are interested, let me know. If not, I’ll take it apart and use the parts for a later project. :)

Have you started something that ended up all wrong? How did you fix it? Trash it? Walk away? Is it still sitting there? ;) Sometimes store bought is just right -- even if you do have to make a few little adjustments to it!

I will show you the whole space SOON!

Tuesday, June 14, 2011

Caulk and Spackle, my BFFs

Helloooo there! Our gorgeous week of weather continues here, but I've been inside addressing a project that I’ve been avoiding for months.

It’s the not-so-fun stuff of room redos that stall me out. I’d rather cut and install molding then do the finishing work – the caulking and spackling and sanding.

UGH.

These are the days I wish I hired out. :)

I haven’t touched the office redo in such a long time…it’s just silly. I still haven’t painted that board and batten. I’ve been procrastinating that fun job because I had another fun job that had to be done first.

“Fun” = sarcasm.

But I picked up a little addition to the space a couple of weeks ago and it’s spurred me on to get it done already!! (More about that in bit.)

I finally got the mdf wall treatment prepped for paint and it’s not my favorite part by any stretch. This stuff isn’t hard, it’s just time consuming. After caulking for so many years, I have it down to a science, so I thought I should share my process.

After a molding project, you’ll need a couple things to finish up the job:

caulk and spackle

Caulk, (and a caulking gun) and spackle.

The caulk also comes in tubes that you just squeeze, but for a job like this – use the gun. For reals. Your hands and arms will thank me. :)

This is what a corner of the office looked like before I started:

board and batten

It doesn’t look too bad far away, but up close you see the meeeeellions of nail holes, the gaps where the mdf pieces didn’t meet up perfectly, and the gaps where the wall and mdf aren’t flush.

When I install molding, I usually don’t caulk anything until right before I’m about to paint the last coat. But with this project there were some big gaps that needed to be filled, so I wanted to make sure they got plenty of coats of paint.

The reason I usually wait till I’m almost done is that MOST of the “gaps” don’t need caulk at all. A coat or two of paint will cover them just fine:

That lower joint will go away with paint no problem. But the larger gap won’t, so it gets the first of my BFFs – caulk.

Before you start – listen carefully. Always, always, ALWAYS use paintable caulk. Alllllways.

Even if you think you’ll never paint it again…use paintable caulk.

You never know what you’ll do in the future – even white paint will need touch ups over the years. Unpaintable caulk does not take kindly to paint.

Believe me. :)

So, you’ve got your paintable caulk. To start, trim off the top of the nozzle at an angle – but don’t cut it too low down on the nozzle. (Up high is a smaller hole, lower is a larger one.)

You want a thin line of caulk in most cases, and if it’s not big enough you can make always make it larger later.

Make sure the angle of the nozzle is up against your surface:

how to caulk

Then squeeze out a small amount into the joint, from top to bottom:

This is why you want a small bead most of the time – if it’s too thick you’re just going to waste a TON of caulk, and you’ll have an even bigger mess on your hands than usual. :)

Did I mention caulking is messy? I’ve tried everything to make it not so messy and it’s failed every time.

Messy is good. Be at peace with the messy.

You’ll need lots of paper towels too. Grab a bunch, get them good and wet, and wrap it over your finger like so:

This is pretty intense huh? ;)

I know you are on the edge of your seat. I know.

Take the paper towel finger and drag it down over the bead like so:

You don’t want to dig in too much, or you’ll remove most of what you just put on. You don’t want to be too light because you won’t take off enough. I usually go over it a few times, folding the paper towel over again with each swipe. 

That’s it! If it’s not perfect, I swear it won’t matter. Especially if you are painting everything out white, you’ll never notice it.

It is an amazing material because it covers a multitude of sins. I know this. :)

The next miracle worker is my friend spackle.

I use this for the holes – and because I’m obsessed with my nail gun, I always have a ton of holes.

I get a little out of control. :)

Git yer tub of spackle, get a glob:

how to spackle

And smoosh it in there:

Random weird note – I always use my middle finger. Not sure why. I’m not mad at ya spackle. :)

Sometimes I’ll have a very large gap where my measurements weren’t quite perfect:

For those, you can either try cutting a sliver to fill it in, or you can just fill it with spackle or caulk. I do both. Sometimes larger gaps like this take more than one application of the stuff, but after it’s sanded and painted, you won’t even notice!

Speaking of sanding – that’s your last step. I pretty much always use sanding blocks:

sanding block

Love those with this shape because I can get into detailed areas.

Sand down your spackle after it dries (I love mine because it dries super fast) – but don’t sand the caulked spots. As far as I know they don’t make sandable caulk. ;)

It took a couple hours to do the whole space – including clean up. But it makes such a difference!:

Better, yes?

My little addition that got this ball rolling is a chair I found at Homegoods – it’s a lot more streamlined and much smaller than the beast we had in there before:

That one is now in hubby’s basement office, and it’s perfect in there!

I was planning on recovering the cushions on both the chair and ottoman, but when I found this chair, I was smitten:

board and batten office

It’s simple, it fits the space MUCH better, and it’s super comfy! I threw the poof in there for now, but I’m hoping to find an ottoman I can recover.

When the drapes are up behind it, it’s going to look SO good.

They look like they were made for each other:

LOVE it!

That pillow is from HomeGoods too – found that a few months ago for $20. It’s nearly identical to the Pottery Barn pillows for twice that. :)

I’m excited to get this ball rolling and have a finished office space. And now that the holes and gaps are gone, it’s finally ready for paint!

Yay.

Whoo.

Yippee.

Anyone want to come help??

Got any spackle or caulk hints? Do share! And seriously, want to come paint my office? ;)


P.S. You can see more of the office redo by clicking here.

Tuesday, March 15, 2011

How to install new door knobs

Wellllll…it only took a year. (I say that a lot don’t I? It only took a month…six months…a year.) And I’m still not completely done. But 98 percent of our doors are rid of their look-away-or-the-shiny-will-blind-you brassiness.

WHOO!!

There’s a few reasons it’s taken so long. First, the order was messed up back when I ordered in February (of 2010!). Second, uhhh…I dunno why. I get easily distracted by other project I guess.

Oh look, a butterfly!

Ha! No really, it’s like that.

So it took a while. I ordered our new oil-rubbed bronze beauties from an online source called Your Home Supply. A sweet reader recommend them and their prices were pretty fantastic. Almost half of what I found at hardware stores.

But there were a couple issues with my order – a few of the knobs had damage, I had accidentally ordered two slightly different bronze knobs (there’s oil rubbed bronze and dark bronze – watch that) and many of the pieces (knobs and hinges) just didn’t arrive.

It took a couple weeks of calling, leaving messages and emails before I called one day and finally got a live person. She was great and took care of getting new knobs out to me really quick…but they still weren’t all there, even in the second batch.

Sheesh. So…I guess I’d say try them out at your own risk? I think if you had an issue, they’d address and fix it, but it may take some time and persistence on your part.

The prices are pretty great – so it may be worth the trouble!

Anyhoo, I’m finally getting the last of the knobs installed. I’ve been meaning to show you this process forever, so here we go!

Here’s a before shot of the brass knobs on my son’s bathroom doors:

I don’t know if I’ve ever showed you that room? It’s pretty darn cute. ;)

There are a few tools you’ll need, depending on your knobs. I needed a pencil, hammer, chisel, Phillips screwdriver and a drill (last two not pictured):

tools for changing out knobs

You may not need the chisel, but more on that in a bit. :)

I start with the hinges – so easy! Use your drill to take the old ones off:

hinges

You don’t need to take the door off – just replace one hinge at a time. Take one old one off, put a new one on.

You may need the hammer to dislodge the old hinge. It’s most likely been there for a while, and it will need a little push to get it off. (I knock it from below the hinge a few times and it works great.)

So once your hinges are on, you’ll be squealing because it already looks so good, but it’s time to move on.

There’s three kinds of knobs – you’ll want to be sure to get the right ones. Privacy knobs are for bathrooms and bedrooms and they lock. Passage knobs don’t have a lock and turn freely – so for closets, etc. Dummy knobs are for spots like double doors – remember you’ll probably need two, one for each side of the door.

This was the door to the bathroom, so it took a privacy knob:

privacy knob

It’s so simple to take the old knob off – just use a Phillips screwdriver to take out the two screws:

Take them out, and the two knobs will come easily apart:

IMG_3507

Here’s where it got a little dicey with my first shot at this…a year ago. :)

Our previous hardware had a small round hole for the latch:

The new hardware did not. :) It had a plate the latch was installed in. I thought this was going to be a major pain in the booty to deal with when I first realized this, it’s not a big deal at all. Hang in there folks…this is the fun part. ;)

Place the new latch in the hole, and hold it in the right spot. Then trace around it:

Then, bust out your chisel and your Tool Man grunt and get to it.

First, place your chisel along your lines, and use a hammer to tap the chisel into the wood, going around your tracing. Then take the chisel and angle it so you can start chipping away at it, again using the hammer as you go:

mortise

You want to mortise out that area so the latch will fit flush, or almost flush. It doesn’t have to be exactly right – just check it as you go. You’ll think you’re taking off a ton of wood, but it would be hard to make it too deep. Just keep checking here and there.

I gotta tell you…using a chisel is way fun. :) It makes me feel all woodsmith-y. I like it. And it’s fun to see the instant gratification with each tap of the hammer.

Once you get the depth right, just screw the latch in:

It’s time to get your new knob, WHOO HOO! It will look something like this:

oil rubbed bronze knob

Just take them apart, and put the part with the long pole into the latch. There’s a curved part on the pole that you’ll want to match up with the curvy part inside the door:

It won’t go in if you have it wrong, so no worries. You just have to match those up. Then place the other side on the back, and put your new screws in:

I use a Phillips for this as well, with towel or rag up against the knob. I didn’t want to chance messing up the finish on the knobs.

Here’s an important tidbit…most times the part of the knob with the screws will go on the inside of the room or the closet. With passage knobs, it doesn’t matter where you put them, but I like having them on the inside of the door.

The important part – ALWAYS, always have a screwdriver with you and stay on the side of the door with the screws while installing. You’ll need to test the door here and there, and once and a while there may be a little something off. Sometimes, not often, but sometimes the door can latch just so in the process and may get jammed. You need to be able to take the knob off (with your screwdriver) if the door gets stuck.

I had a few sweaty moments over the course of changing out all of the knobs in our house. And one of my BFFs may or may not have locked herself in the bathroom when this happened. Not just the bathroom – her little bitty potty closet. We (I?) laugh about it now, but she says it was so scary to be stuck in there, with no way out. (She busted the knob to get herself out.)

So anyway…keep the screwdriver, stay on the screws side, or at least have someone at home while you’re doing it. ;)

OK…we’re almost there peeps!! SO CLOSE. The only little bit left is the strike that’s in the door frame:

The new strike comes with the knob. You’ll just remove the old one, and install the new one like you did the hinges.

This is where you want to heed my earlier advice – you’ll need to test the door with the strike – sometimes things get a bit off in the process and they don’t fit perfectly together anymore.

No biggie – just move the strike around a little, or chisel out a little from behind it, and you’ll be good to go!:

Isn’t she lovely? Isn’t she beautiful? :)

I’m gaga over the contrast of the white doors and dark hardware:

oil rubbed bronze knobs

Right up my alley baby!

I know I give brass a hard time…a little too much of a hard time? Maybe.

Sorry Brass. Nothing against you…I just don’t like ya. Your Antique Brass cousin? LURVE. Shiny you? Notsomuch. I’m so not sad to see you gone. :)

So there you go…even with the mortising, it doesn’t take that long once you get the hang of it. Now I can get the whole door changed out in about 20 minutes. I’ve had a lot of practice over the past year though. :) Only two more to go…and I’m DONE.

If you don’t have to chisel, you could change out these in ten minutes easy. Swear – I promise you can do this!

Here’s the before and after, side by side:

Classy. ;)

I also used the chisel to mortise out the hinges for our new pantry door last fall. It’s the same idea – just trace the hinge, then chisel it out. It doesn’t have to be perfect – it’s covered in the end!

Now that I’m used to using it, I’m want to get my chisel on and make some kind of woodworking masterpiece someday…after I finish the knobs that is. :)