Showing posts with label I am cooking?. Show all posts

Tuesday, September 6, 2011

Comfort Foods

Can someone check my temperature? For real – I have been a cooking fool over the past week. Like, using my crock pot more than I have in the past year.

In a week.

And this, the week we have no kitchen. Well, we have one, but it’s kinda half of one – I have to walk across the house to get to the fridge in the garage. Which makes cooking way more exercise than usual.

Maybe I’m burning off the calories of this good stuff?? Maybe not.

And really, is crock pot cooking really cooking? When I do next to nothing and it does it all, I feel like I’m cheating when I say I’ve been cooking.

All I know is I’ve been making yummy meals and I’m loving it. Imagine how much I’ll love it when I have my island and garbage can and refrigerator back? It’s going to get spectacular!! ;)

I’m sharing some of our favorites from the past week or so and some changes, if any, that I made to them. (I’m just sharing the original poster’s pics and I’ll recap each recipes here.)

First up – a truly scrumptious recipe I found on Pinterest from Bubble Crumb:

Crock Pot Chick and Dumplings

IMG_1890

It is SOOOOO good! Whooeee, I’m so thrilled to find this. I am a chicken and dumplings NUT. Have you had them at Cracker Barrel? (I almost wrote Crate and Barrel. You can how much I think about cooking – never.)

Anyway – yummo! This does not disappoint.

Here’s the deets:

4-6 boneless skinless chicken breasts
2 tablespoons butter
2 cans cream of chicken soup
1 can chicken broth
1 onion diced (I used half of one)
1 tablespoon dried parsley
4 grands flaky refrigerator biscuits (I used five)

Put the chicken, butter, cream of chicken, chicken broth, parsley and onions in the crock pot and cook on high for four to six hours. Mine only needed five, and probably didn’t even need that much.

As the chicken cooks and gets tender, break it up with a spoon or fork, whatever.

Get your biscuits and cut them into nine pieces. I kind of rolled them into balls to ensure they stayed whole but it’s not necessary. Stir into chicken mixture and cook for another hour.

(The recipe says to cook for 30 minutes and my biscuits were not done at that point. One hour did the trick.)

I noticed as it cooked that it was a tiny bit thick, and the recipe said to add chicken broth if necessary. I was out of that, so I used chicken soup and it worked great. ;) I just put a bit in to make it a little creamier.

It was AWESOME. (!!!)

Next up, one of the many great recipes from Tracie’s place that I shared last weekend. This one is crock pot mac and cheese:

Crock Pot Easy Mac and Cheese

DSC_0149

The goodies:

1/2 pound elbow macaroni
4 cups shredded Cheddar cheese, divided
1 (12 fluid ounce) can evaporated milk
1 1/2 cups milk
1 egg
1 teaspoon salt
1/2 teaspoon ground black pepper
Dash of Worcestershire sauce

Very important before you do anything – spray the crock pot well with cooking spray. This cheesy goodness will stick otherwise. I sprayed but not well enough. :)

Mix the egg, fresh milk, evaporated milk, and Worcestershire together in a large bowl. Mix in the uncooked macaroni and three cups of shredded cheese. Pour into the crock pot and sprinkle the remaining cheese on top.

Cook on low for five to six hours. Do not stir or remove lid while cooking.

That whole not stirring thing was so hard for me. Not sure why. I always feel the need to stir.

I cooked ours on high for five hours and it only needed four, if that. It was a bit overdone. I also used a bit too much cheese (I know, is there such a thing?) – I used thicker shredded cheese, and I think the finely shredded would have worked better. It was just major CHEESE and combined with being cooked a bit too long, it wasn’t as good as I know it could be.

But, it was still GOOD. :) I know it would be GREAT with those little changes. I plan on giving it another go this weekend. ;)

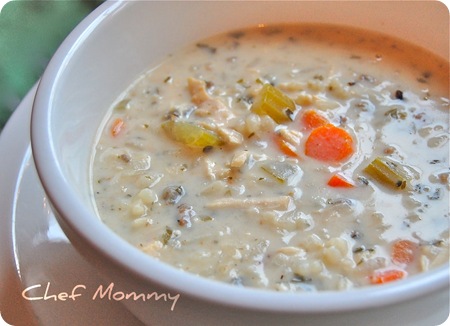
And I saved the best for last…hold on peeps. This is fan-freaking-tastic. I also found this on on Pinterest and it’s from Chef Mommy:

Crock Pot Creamy Chicken and Wild Rice Soup

Ohhh…I’m drooling just thinking about it. SO. GOOD.

This one takes a teeny bit more work, but it’s so worth it.

4 cups chicken broth
2 cups water
2 boneless, skinless chicken breasts
1 package of Rice-a-Roni long grain and wild rice
1/2 tsp salt (plus more to taste)
1/2 tsp pepper
3/4 cup all purpose flour
1/2 cup butter
2 cups half and half
1 cup grated carrots
1 cup diced celery (we’re not bit celery people so I used one small can of mushrooms – SO GOOD)

Mix the broth, water, carrots, mushrooms, chicken and rice (and the seasoning packet) in the slow cooker.

Cook on low for six to eight hours or on high for four hours. I did the high version and it turned out great.

Once chicken gets tender (couple hours in), break it up into pieces while cooking.

At the end of the cooking time, get a small bowl and mix the salt, pepper and flour. In medium saucepan over medium heat, melt butter. Stir in flour mixture by tablespoon to form a roux.

I had no idea what a roux was, but found out it’s a mixture used as thickener for stews, soups and gravy:

roux 
(source)

Then, while still on the heat (I’m guessing here – that’s what I did), whisk in the half and half, a little at a time, into the roux until mixed completely and smooth.

Stir this yummy mixture into the soup in the crock pot then let it cook on low for 15 more minutes.

Then die and go to heaven cause it tastes that good.

Oh my goodness. I think I need to go eat some leftovers.

Mine was a bit thick – almost like gravy, not soupy like the photo. But that’s how we like it. :) You could add a bit more broth if you like it thinner. (Wait to see how it cooks up first.)

So there you go – my very favorite comfort foods from the past week! I really don’t know what is wrong with me – we’ve had cool weather the past couple of days, but the chicken and dumplings I made on a 95 degree day.

I guess I’m just craving comfort. ;) If you are too, you can’t go wrong with any of these!

Any yummy, easy fall recipes you make all season? I’d love to hear about them -- I need to plan out the dinners for the rest of the week. Stop laughing, I’m FOR REAL.

Yes, taking my temperature. And then reheating some leftovers. Hollllla…

Monday, May 23, 2011

For the love of basil

Hello hello! I hope you had a fantastic weekend!

Some of you (my family) may know that I’m not the biggest cook. I know how to cook, I just choose not to.

Or something like that. :)

Actually, I do cook, just not as much as I should. I enjoy it when I do it. It’s the whole planning thing I have a problem with – I kind of fly by the seat of my pants with most meals, using what we have on hand. If we don’t have it on hand, I don’t cook. :)

But when I find something that’s easy, I make it a lot. And when I find easy, quick, tasty food, I like to share it with you, my Squeezies. Cause I’m nice like that.

I showed you our basil plants last week and how they are absolutely busting with yummy leaves. I LOVE basil so it makes me giddy.

I figured I would show you some of my favorite (new and old) basil recipes. They are all SCRUMPTIOUS!!

First – one that works for a quick snack or a great dip for parties. It’s simple, it’s basic, and I didn’t realize how easy it was to make till a few years ago.

All you need to make pesto are four ingredients:

Pesto:

Grated Parmesan cheese
Extra-virgin olive oil
Garlic
Basil leaves

You’ll notice I didn’t mention measurements, and that’s because I kind of wing it when it comes pesto. Usually pine nuts are included in the recipe too, but I don’t LOVE nuts, so I don’t include them.

You just throw everything in a processor or chopper:

Mix to to the consistency and taste you desire. I like a lot of basil, so I do a lot of basil, a lot of cheese, a little olive oil, and an even smaller amount of garlic.

Taste and mix, taste and mix, till it’s where you want it. And then eat it with crackers:

pesto

It’s SO yummy!! Most pesto recipes will be more liquid – but I like a thicker consistency.

Oh em gee, I love this stuff.

Now that we have an appetizer, let’s move on to the main course. :)

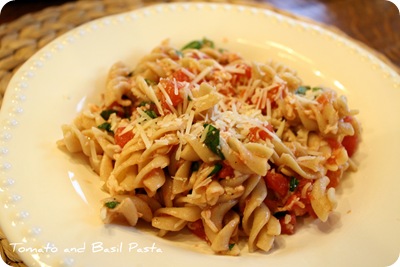
This Tomato and Basil Pasta is SO simple and good, you won’t believe it:

Fresh Tomato and Basil Pasta:

3 medium tomatoes, chopped (or one canned, like me)
1/3 cup chopped basil leaves
1 Tbsp. olive oil
1 clove garlic, minced (or one tsp, but I used one Tbsp.)
1/2 tsp. salt
1/4 tsp. pepper
8 oz. rotini pasta, uncooked (I used about one and a half cups)
3/4 cups grated Parmesan cheese (I used about a cup)

This dish really couldn’t get any easier. You just mix everything together while cooking your pasta:

I had two cans of tomatoes in the pic, but you only need one. It’s more than enough.

Then mix with the cooked pasta, and top with some more Parmesan:

fresh tomato and basil pasta

SO GOOD!!! Oh my, this is so perfect for summer – it’s light, fresh, and pretty darn healthy. I use whole wheat pasta, so that helps even more.

You can also make it as a pasta salad as well, by just rinsing the pasta after cooking then refrigerating it. That one screams summer! :)

Finally, I tried out a new basil cocktail and it may be a new favorite. Yes, I said basil cocktail. (Did I mention you’ll need to LIKE basil for these recipes?)

This one is a Bacardi Dragon Berry Strawberry Basil Lemonade:

I’m just calling it Strawberry Basil Lemonade for short. :)

Strawberry Basil Lemonade:

2 parts Bacardi Dragonberry Rum
1 part lemon juice
1 part simple syrup (I used sweet lime juice instead)
3 basil leaves
3 strawberries (hulled and chopped)
2 parts Sprite (the recipe didn’t say how much to use but I did two parts)

To make this yumminess, muddle (crush) two basil leaves and two strawberries, then add those to the fresh lemon juice, simple syrup and Bacardi rum in a shaker with a bunch of ice. Add the Sprite and you’re done:strawberry basil lemomade

This is SO good, yummo!! It may be my new favorite summer cocktail. It’s going to be perfect for evenings out on the deck.

Again, if you don’t like basil and strawberries you probably won’t like it. But if you do I’m betting you’ll love it like me. The basil gives it just a tiny kick that is so different and fresh.

Did I mention yummy? ;)

(Check out my simple Summer Beer recipe here, it’s another warm weather favorite. And I hate beer!)

So there you go – a plethora of basil recipes, all easy and sooooo good. All perfect if you grow your own basil – it’s such a kick to go outside to pick my own food. Love it!

I’m linking up to my friend Rhoda’s recipe party, in our Home May’d linky series:

You can start linking up your summer recipes Tuesday morning!

So are you a basil lovah like me? Can you believe I first tried it only a few years ago? Now I can’t get enough. :) Excuse me, I’m off to snack on some pesto!

Wednesday, December 15, 2010

Peanut butter bliss

OK, peeps – I don’t claim to be a fantastic cook or baker. I mean, there was the cake fail of last summer, ifyouknowwhatI’msayin’.

Well, even that one tasted good. I just looked all wrong. :)

But every once and awhile I open my recipe binder (it creaks and a cloud of dust poofs out) and find one I love and I just have to share. You will thank me. :)

I’ve made this “pie” for years, but for some reason it’s been a while since I last did. And now that we’ve had it again, I’m quite sure I’ll be making it weekly. Or so.

It’s SO easy. And insanely good. You will LOVE it. That is, if you like peanut butter. Or chocolate. Or sugar. Or for all that is GOOD – if you like anything YUMMY. Then, you will LOVE it.

You’ll need just a few ingredients:

3/4 c. confectioners sugar

6 oz. cream cheese

1/2 c. peanut butter

one container Cool Whip

2 tbsp. milk

graham cracker crust

I buy the crust ready made, and I add a little somethin’ extra by using a chocolate crust:

Aw. yeah.

It takes about five minutes to whip this baby up – first, mix the cream cheese and sugar:

Sorry, these pics were taken at night, spur of the moment. Not my best work. :)

Then mix in the peanut butter and milk:

I took the pictures in case you’ve never mixed anything in your life. :) Mr. Obvious, I know.

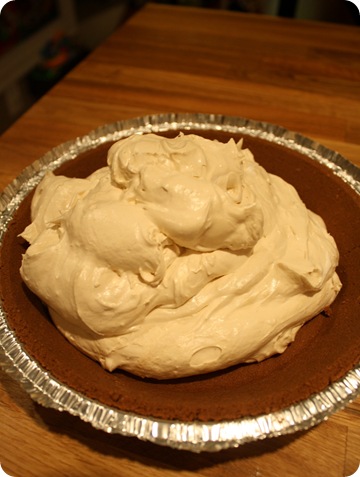
Then just fold in a container of Cool Whip (leave a little bit for later), plop it into crust, and resist the urge to eat it up with a (large) spoon:

Oh. em. gee. Isn’t it so fabulous and fluffy? Does anyone else love Cool Whip so much they could eat a whole container? Or, think they could eat the whole container? I wouldn’t know that first hand.

Or something.

Then comes the hardest part of the whole pie – you have to let it chill for a while. A few hours is best, but I can tell you from experience that one hour is just fine.  :)

After it’s chilled a bit, lather the pie with more cool whip. Then drizzle some chocolate over it, maybe sprinkle some peanuts, and you have one of the easiest, yummiest desserts EVER:

I am aware it looks like I had our four-year-old drizzle the chocolate. But only I can take credit for this beauty. I told you earlier I don’t do well with the whole presentation thing.  (Aqua and coral Fourth of July cake ring a bell?)

Anyhoo, who cares what it looks like? It’s FANTASTIC to eat. Whoooeee.

It’s called Jimmy Carter Peanut Butter Pie. I call it peanut butter heaven. Try it, love it. And don’t blame me when you eat the whole thing in 24 hours. :)

I’ll be back with a quick Christmas project tomorrow!

Thank you to my sponsor!:

Tuesday, June 29, 2010

Cake FAIL

Many of you know I share the good and the bad on this little ‘ol blog. I have shared my house at it’s worst, as well as many projects I deem “science fairs” (translation = they don’t go well).

Well this one is in the science fair category for sure.

One of the many things I love about blogging is that I will now try things that I may have never attempted, because if it turns out I’ll want to share it with you all. And if it doesn’t turn out, I’ll want to share it with you all.  ;)

Let’s preface the rest of this post by saying I have baked a cake before. Many. You may not believe me after I show you this, but I cross-my-heart-swear I have.

Swear.

OK, a few weeks ago, someone on twitter sent along a picture of one of the cutest cakes I’ve ever seen – I can’t remember for the life of me where I saw it, but it was an ADORABLE Fourth of July flag cake. Not the regular sheet cake, but one that looks all boring with white icing and then PADOW!, you cut into it and there’s this gorgeous American flag cake.

Adorable.

So I’ve planned for weeks to try this out. And today I did.

And it:

a.) took FOREVER

b.) did not look like the picture

c.) like really, really did not look like the picture

d.) still tasted really good. :)

I figured I was going to have issues when I added the food coloring to the batter:

I needed some of the batter to be red for the red stripes, some white, and some blue for the blue corner of the “flag.”

Ummm…that batter up there? It’s not red. It’s pink. Maybe coral? Not red.

I added a little gel food coloring, then more, then a lot. Still coraly pink. Ohhhhkay.

I trudged on…and it was just one thing after the other. I learned some things this first time around so next year (oh yes, I will try it again!) I’ll remember them.

First tip is to just make all of the cake batter at ONE time, then segment it into five equal parts batter for all of the stripes. You can then color each batch whatever color you need, instead of making separate batches and coloring them as you go.

I did the red pink batter first and baked those cakes. Then I was going to make the white stripes, and put some of the batter aside to make the blue cake I needed. But I lost my mind for a few seconds and put the blue coloring in before I separate them – and then tried to get it out before I mixed it.

It didn’t work.

Hot mess. HOT.

I ran out of cake mix (oh yes, I used box mix!) and found a white Christmas cake mix in the pantry that didn’t expire till next February – SCORE!! I used that for the white layers I needed.

But it was still just a mess. I got whipped icing cause I LOVE WHIPPED ICING and it did not cover the cake well at all – I mean, seriously. Are you kidding me?

I just said forget it, garnished it with some stinkin’ fruit, and from the outside it looked OK:

OK, it was a hot mess. Just humor me.

But when you cut it open, the fruit on top accentuates the clash of the blue/aqua and red/coral/pink:

american flag cake

Awesome.

In the original cake I saw, there were two bottom layers of red and white, then two smaller white and red layers on top next to the blue. I didn’t have room for the top white layer. So my flag is red, white, red. Gah.

To make the flag, the bottom layers are just round cakes. The blue corner is a layer of cake, cut into a ring and placed on top of the other two. The middle two layers (what should be two layers) are the inside circle of two additional cakes. You ice between layers and then piece them together.

It’s just that easy.  :)

When hubby saw it today he was so excited I had made cake!

Then I asked, did you see it, the inside? Do you like it?

“Yeah it’s cute!” (He says just seeing the fruit and white icing. From far away.)

“See the flag inside?”

He steps closer.

“The what?”

“The FLAG.  See the three layers of pink, white, pink and the aqua? It’s an American flag!”

Crickets.

 “Ohhh, yeah. I see it! It’s cute!” (LYING. Because he loves me. And he still wants a slice of cake.)

I must say, the leaning tower of pink and aqua cake is absolutely scrumptious:

It’s not so pretty but ummm umm it’s GOOD!! :)

I have a ton of cake scraps left:

022

(Uh, is it me, or does it look NEON?)

So tonight I made some itty bitty trifles:

mini trifle

The cutey itty bitty trifle bowls courtesy of WalMart -- $2 each!

Again, I continue to accentuate the pastel tone of the cake with the fruit, but you know what? It’s GOOD! :)

So there you have it – my science fair cake fail. But what do you consider a cake fail – if it looks like a hot mess, or if it tastes like a hot mess?

Maybe it’s not a complete fail? Just a half-way one? I’m going with that.  :)

I’ll be back soon with an update on the kitchen! Kitchen projects I’m pretty good at. Fourth of July cakes – notsomuch.


P.S. The cake was from a blog with the title that was something like 18 and baking, or something like that? If you know of it, let me know! :)

**Thanks! I found it! Click here – this girl is ahhhmazing!!

P.P.S. Many are suggesting gel food coloring and that’s what I used – maybe the whole tube just isn’t enough?  ;) I have no clue – any other ideas?

This post brought to you by:

rustedcapture125

Monday, June 7, 2010

Before and After Party: Strawberry Jam!

009Geez Louise, you could practically pull my fingerprints off that picture! ;)

I have to start off this post by letting my Dad everyone know that yes, yes I CAN cook. I can bake. I can make dinner. And I can even pour milk into a cereal bowl.

All of the above. (The last one I do very well, thankyouverymuch.)

I just don’t cook and bake very often. With hubby’s crazy work schedule and a three-year-old who lately eats nothing other than cheese and hot dogs, I just don’t do it as much as I’d like.

But something about my transforming (beautiful!) kitchen and summer is making me want to cook and bake up a storm. (I’m going to try a out a doozy soon and will be sure to show you.)

So when I saw my friend Beth’s post about making strawberry freezer jam (and how unbelievably easy it was), I knew I had to try it!

Today was an absolutely positively gorgeous day here in the Midwest, so I corralled my BFF and her daughter, and the four of us took a trip out to a local berry farm to collect strawberries:

002

It was a big-fat-white-clouds-in-a-perfectly-blue-sky kind of day – lovely!!

We put the kids to work starting picking the berries:

003And the smart ones (the kids) realized VERY quickly that picking strawberries – not so fun. It’s hard work! So they stood around pointing to the good ones while the moms picked through the plants. :)

We finished our afternoon with some ice cream and a visit with the resident cutie-patootie doggy:

019

He’s just a BIG SWEETAY!! (If you can tell me where that’s from, I’ll send you a dollar. Just kidding. I’ll really want to send you one but won’t. Maybe a virtual dollar.)

Anyhoo, this evening I got to making my JAM – for the first time ever!! It was SO incredibly easy! If you read Beth’s post, this is pretty much a complete copycat of hers, but I have a dark stove and counters and she has light ones.  :)

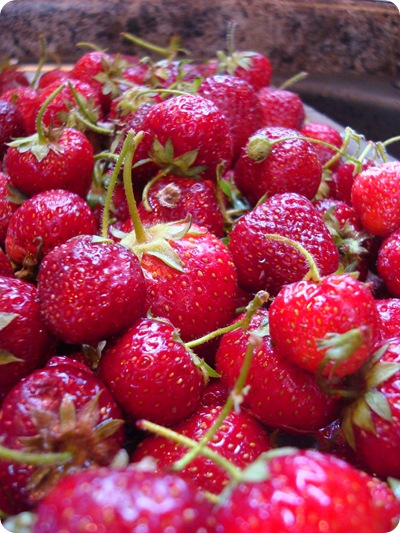
I started with my luscious berries – I got extra just in case, and ended up with about five pounds of berries:

After rinsing and cutting off the stems, I used a potato masher to smash up the berries to two cups (smashed):

I didn’t even chop up the strawberries first. I had to start with about 2.5 cups (maybe a little more) of berries to get the two cups smashed.

Then, add to the mashed berries FOUR cups of sugar:

YES. Four cups.

Yes, that is only two. Add FOUR. Like Beth said, “Just don't think about it.” She’s right. I had to force myself to pour it all in. But I hear it’s totally worth it in the end so just close your eyes and POUR. :)

Mix it all together, and keep mixing here and there for about ten minutes:

For the last two minutes of that ten, take a package of Sure Jell and mix it with 3/4 cup of water on the stove:


After it starts boiling, let it boil for one minute and keep stirring!:

Take the mixture off the stove, add it to your berries and heart attack sugar, and stir for about three minutes (maybe a bit more).

Then take your so-cute-I-could-just-die jelly jars from Wally World:

I think it was about $8 for 12 of them?

And fill them up, about a half inch from the top of the can:

 strawberry freezer jam 

Let them sit at room temperature for 24 hours, then you can freeze them. I plan to bring them to cook outs and Fourth parties throughout the summer as gifts to the hostess – maybe with some yummy bread on the side? How precious is that?

And once I make a super cute label to dress them up, they’ll be too cute for words. Anyone know if these are OK to freeze until the holidays? If so, then the mailman better like strawberry! :)

I haven’t tried them yet, but I did have to lick the spoon at the end and YUMMO – it was good!!

I couldn’t believe how easy this was! I did two batches and that made 11 jars of jam and both only took me about an hour to make. Rinsing and cutting the stems off the strawberries took longer than the whole process did!

I still have about a pound of berries left too, so I didn’t need nearly all that we picked.

So my different kind of before and after for this month…

Before:

And after!:

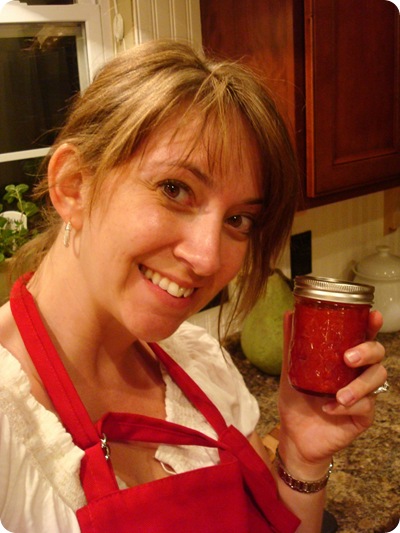
Yes I'm wearing an apron

And yes Dad, I do own an apron.  ;)

So now it’s time to see your before and after projects!! Anything goes – as long as you have a before picture to share, cause we all know that’s half the fun!

PLEASE link to directly to the post, not your blog. (I have to delete those and I hate it!) To link to your post, right click on the post, copy, and then paste that url into the linky.

You can link up till next Monday -- have fun!


Thank you to my sponsor!:

rustedcapture125

Sunday, December 6, 2009

How I throw a Christmas party

008

I LOVE to entertain – it is my joy sharing our home and having friends and family here, eating great food, drinking good drinks and laughing. Lots of laughter. :) This year, we will host three parties this month, and the first was this past weekend.

A few of my girlfriends and I get together every year for our annual ornament exchange. It’s been six or seven years now – none of can remember how many. (We’re getting old.) Since almost all of the Christmas decor is done, (except the main tree -- it just had lights, which was still beautiful), I was able to focus on my regular freak out preparation for the party.

Every time, I say to myself…”I’m not going to clean like crazy. No one will notice the dust on the table. No one will see the toys stuffed under the bed. No one will even go into most of the rooms of your home Sarah, sogetagripwoman!” Yeah. No one will know I’m super psycho and have to clean every inch. Crazy woman.

I don’t clean before the day of the party though – it’s just asking for a special dose of crazy. The little tornado in this house makes that impossible. :) So I’ve learned a trick so I can pace myself to get the house picked up impeccably clean in time for the party.

First step, send the Bub off to the ‘rents. Hubs was out of town, so it was just me. I turned up the ipod and set my timer – 20 minutes per room. I start with picking up, then vacuuming, then dusting. Once the timer goes off, I have to stop and move on.

This works for me because I’ll get lost in cleaning and keep going and going in a room if I don’t have that timer reminding me to move the heck on.

Once the cleaning is mostly done, it’s time to cook. Contrary to popular belief, I can cook. I do cook. I just don’t do it often. :) When it comes to parties, I have a few standbys that are cheap, easy and quick. You can totally make them in between dusting the family room and curling your hair:

Pinwheels

dash of pepper

2 tbsp onion

1/4 c bacon pieces

1/4 c black olives (chopped)

8 oz. cream cheese (softened)

package crescent rolls

Mix all ingredients in a bowl. Take the crescent rolls and lay them out on a cookie sheet, smushing the edges together so it makes one large sheet of dough. Then just spread the mixture evenly all over:

004

(This picture was pre-spread.)

Then, just roll it up long ways, so it looks like this:

005

At this point, I like to put it in the fridge for a while so it firms up just a bit. Then, just cut it into sections, and bake for 15-20 minutes at 350 degrees.

YUM-O:

010

They are such a perfect mix of buttery roll, a teeny bit of onion and bacon flavor. Who doesn’t love bacon? Serious. Obviously you can take out or add whatever you want for your taste.

The next one is to. die. for. Do you love those cheddar biscuits from Red Lobster? Those buttery, flaky, uuuhmazing biscuits? These are from Southern Living and are so similar. And only three ingredients!

Tiny Cream Cheese Biscuits

one 8 oz. package cream cheese (softened)

1/2 c butter (softened)

1 c self-rising flour

Easiest recipe eva. Mix all ingredients with a mixer, (it will be very thick) then spoon the dough directly into mini muffin pans. Bake for 15-17 minutes at 400 degrees.

I didn’t take a picture of these because I was too busy eating them entertaining. But this is close to what they look like:

biscuits

(Source)

A friend said you can make your own self-rising flour, which I didn’t know! If you want that real Red Lobster taste, just mix in some cheese, or sprinkle some on the top after they are done. They are incredible without though. Seriously, you’ll thank me. :) Heaven in a teeny little biscuit.

I found the easiest cookie recipe, and the easy is mostly because it’s the cookies you get in the package, already cut. But with a few more minutes of work, they become especially scrumptious and adorable.

Three ingredient Christmas cookies

package Pillsbury Christmas tree cookies

one tub icing (you need very little)

sprinkles

Make the cookies as directed, then let cool. Take the bottom of one cookie and ice it (I always use whipped icing and it was especially good on these!). Then place another cookie on top, making a sandwich. Push them together so the icing smushes out, then roll in the sprinkles.

We were ALL surprised at how good these were. I added red hots to the trees just for some spice, but they are not needed:

007

I’m not even kidding, these were SO GOOD. Makes me what to make more right this very minute. Yums.

There were only ten of us and we ended up having a TON of food (this wasn’t all of it!):

013But we ate most of it. ;) The beverage of the evening was Sangria, and it is absolutely my new favorite drink. So sweet and fresh and fruity. I’ll show you how I make that after the upcoming Mexican Fiesta!

Are you hosting family and friends this month? Do you go with the flow to prepare or there others like me out there? (Please say yes.) This was the smallest of our three parties, which was a good way to start off the season. Can’t wait for the next two – I just wish they were this week, cause my house is still clean.

I’m off to eat some biscuits peeps.