Showing posts with label fabric. Show all posts

Wednesday, August 17, 2011

Pottery Barn pillows (on the cheap!)

pottery barn pillows blue yellow

Well hello! Hope you are having a great week! There has been awesome progress on our outdoor project this week, and I’ll show you that very soon! It is SO exciting to watch an ongoing project that I don’t have to complete myself. It’s an odd feeling to not be doing the work…but pretty a cool one. :)

Anyhoo…so I may have mentioned a few times that I’m nutty for the Pottery Barn catalog. I’m pretty much counting the days till the fall version arrives. (There will be some gleeful squeals. Get ready.)

It’s totally free inspiration, as is a trip through the store. ;) The store version is more dangerous though…cause you may or may not find a couple $3 mercury votive holders you MUST. HAVE.

Or something.

Last week I took a trip though to see if they had fall stuff out check out the inspiration, and I ended up at the table linens area. I noticed a few things – first, they were on sale. SCORE. Secondly, they had so many fantastic napkins, in some fabulous colors and combos.

I put a few together to show how they could work together:

 ikat pottery barnpottery barn napkins

Why would you want to combine napkins in different colors in designs you ask?

To make them into pillows of course! I noticed a trend while there – many of their napkins are also versions of their pillows:

So my brain got to thinkin’. And you know that’s dangerous…for Pottery Barn anyway. ;)

I wanted some late summerish, (almost) fallish pillows in our living room, and wanted to break away from the standard reds and browns I’ve always used. I’ve been pulling in blues over the past year and was determined to make the blues work for fall(ish. It’s not fall yet. I know. Ish.).

I have a love/hate relationship with our sofa in that room – it’s OH so comfy, and actually a great, sturdy couch. It’s just the fabric…oh my dear, it drives me NUTS. And the color, it’s as gold as gold can be. I want to recover it but that’s an entirely different post. Altogether. A long one.

Anyhoo again. I decided to just work with the gold instead of fighting it, and PB had some beautiful yellow and blue combos that I loved! There was an awesome ikat pillow in the store that day:

blue yellow ikat pottery barn

(It was the one on the left but I love both!)

I’ve never been a big ikat girl, and I know it’s trendy, and I’m probably coming in at the end of the trend, and all the sudden I like it. Of course. I’m OK with that. I like what I like, when I like it. Don’t try to make sense of it, your head will hurt. ;)

So I grabbed a couple of napkins and made myself a pillow:

DIY pottery barn

Boom.

Their (embroidered) pillow cover, $59. Mine, I think $8?

I had some fabric for another (upcoming) project, and thought it worked great with the blues in the PB linens. So I made another pillow. LOVE. (I got that blue fabric at Joann’s a couple months ago.)

I found a blue and yellow placemat at PB that day as well, and I knew just what to do with it. I opened the side seam and stuffed it:

pottery barn placemat pillow

Like I’ve shown you here. And a how-to here.

Two Pottery Barn pillows for less than $20 – gotta love it! And I could have made three if I used the ikat napkin on one side and a basic white fabric on the back.

Because I saved so much on those, I splurged on the big blue medallion pillow in the back. I have purchased PB pillow covers before and they hold up GREAT.

But like always, I used a pillow we had to fill it – but it was still a bit wimpy. I hate wimpy pillows. So I stuffed a bed pillow in there:

IMG_6368

I do what it takes. :) It worked great!

And like always…my versions are not for the faint of heart up close. A little rough. So let’s stay far away:

blue and yellow pillows

:)

I’ve been trying to be more adventurous with mixing patterns and colors – the colors in the pillows are in the drapes and I love how they all tie together!

And I love that ikat so darn much I think I’m going to make another one to put on another chair in the room. :)

I have to show you another find for this room! I have wanted to replace our chunky Goodwill coffee table that has been in and out of there:

(Old pic from the red and black days.)

While on a trip to Garden Ridge last week, I found pretty much EXACTLY what I’ve been looking for:

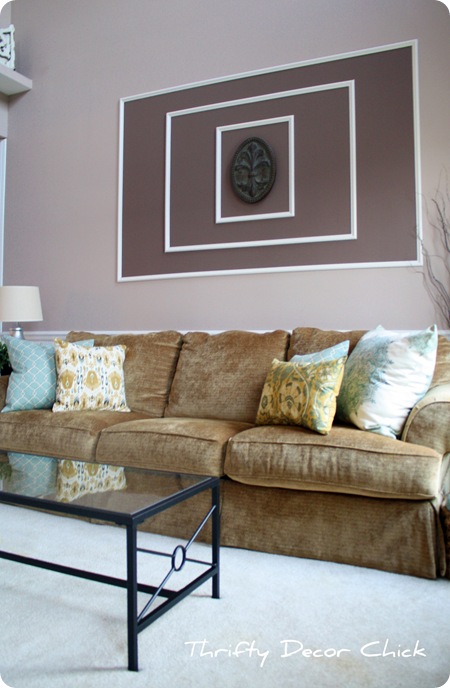
It opens up the space SO much! I LOVE it.

It was $60, but I figure if I sell a couple Craigslist coffee tables (on Craigslist), I’ll make up for that easy. (I've got a couple.)  ;)

I have a few more changes planned for this room, but for now, I’m so happy with how it’s changed over the past year:

The pillows and coffee table have transformed it yet again…for $80. And yet again…I have ensured that Pottery Barn will never advertise on TDC. ;)

You can make pillows out of just about anything – linens, shower curtains, sheets, whatever! The possibilities are endless! Have you made any unconventional pillows? Link to them in the comments if so!

Monday, August 1, 2011

Before and After Party: Buh Bye Pleather

So….you remember that one time, when I was redoing my office? Yeah. It’s taken a while. I’m just so easily distracted, really.

A few weeks ago one of my very best bloggy friends came up to help me out with a project. Traci from Beneath My Heart came to town and I could NOT have done it without her help. That’s what we told her hubby anyway. ;)

I wanted to reupholster the chair in my office:

I got it from Bombay Company years ago, and it’s a great chair, just not the look I’m going for in this space. I wanted to reuse it if at all possible.

My plan all along was actually to make a slipcover for it. But when we sat down to check it out, we realized a slipcover wouldn’t work with the pleather – it would slip and slide all over the place.

So we decided to take it apart and just cover each part individually:

recovering parson's chair

Because this was in no-spend July, we used some fabric I bought months ago to make a bed skirt for our bed. That never happened. :)

I think we had plenty:

cutie

;)

We covered the seat like I’ve shown you a few times:

recovering a seat

Then we stopped to tickle a Bub:

OH my goodness, I think the Bub loved Traci more than I do…and that’s a lot. :) He still talks about her.

The original plan was to tuft the back of the chair (it was already tufted), so we took the back portion off:

And then put a dog on it:

Nut

He wasn’t helpful. Really.

We left the pleather on the rest of it and just covered it, much like the seat:

back of parson's chair

We used a staple gun for all of the recovering, which was a bit of a pain. The staples were too shallow and wouldn’t grab the wood. We had to do each staple at least twice.

That part was SUPER FUN!

Then we took a nap:

Trace loved the new sofa. ;)

The next day, we put the chair back together and started the skirt. I knew I wanted it skirted because of all of the legs on the desk -- I thought having the chair legs hidden may help to break up all the legginess (word?) a bit.

Traci showed me a bahhhhrilliant way to fake a custom skirt. We hemmed up little corner pieces and then just stapled them along each leg:

When were done, this is what it looked like:

DIY chair skirt

Then Traci had to go, and she left me to fend for myself. We all cried. OK, not really, but my eyes welled up. A lot. :)

It only took three weeks, but I finally finished it up. You all know how efficient I am, so this should not surprise you.

We had hemmed up more fabric, and then I cut it to fit along the sides and just hot glued them on, leaving the corners exposed a bit:

Yes, hot glue baby. It works. It does the job. You can’t tell. It’s not perfect. (Never is.)

Once I trimmed up the fabric, I needed to cover the raw edges, but I didn’t have anything that would work. I was determined to make this happen without spending anything, so I went to some extra fabric I’ve been using in the space:

DIY trim

I cut the blue stripe out of the fabric, then used my hemming tape to fold it over and make a “trim.”

I had to do the same for the back:

By the way, we didn’t end up tufting the back of the chair because 1.) it was going to be a pain in to booty and 2.) the fabric looked like it would tear if we poked through it too much and 3.) it was going to be a pain. :)

Once the trim was in place, it covered all the glue gun sins perfectly:

I came up with a nifty little way to hide where the pieces came together on the back – I just took some of my DIY trim and hot glued it around the edges of the blue banding:

reupholstered parson's chair

And I LOVE how it turned out!!:

reupholstered parson's chair

You can see I threw together a little pillow, with my cutie little sewing machine I showed you here. Traci was not a fan of my little Pixie machine. Pixie’s a little slow going, and you have to be patient with her…but she gets the job done.

Just like me and this office. ;)

Like I said, it’s not perfect, not even close. But I’m totally OK with that, if you haven’t noticed.

So here’s some before and afters for ya – a WAY before of the chair in the other corner, as it was before:

image

Geez, that seems like forever ago! OH, that’s right…it was forever ago. I swear I’ll finish this room soon. :)

And now:

board and batten office

Can you even believe it’s the same chair? Nuts!

You’ll notice from the first pic (up on top) that I changed up the orientation of the desk. The chair was hidden behind the desk before, and I wanted to show it off! I just feel like this way works better in the space.

But who knows if it will stay this way. I’m still not 100 percent sure anything in the room will stay where it is. :)

Here’s a before of the corner where the desk and chair sit:

And as it is now:

board and batten office

And…NO. I still have not painted the board and batten. It WILL happen this week – it. will. happen.

If I say it out loud it will come true, yes? ;)

Really though, I will have this space done this month, I’m sure of it. It’s about time. I’m painting tomorrow…swear.

So there’s my before and after for this month! I can’t wait to see yours!

Link them up folks, and remember to use the html from your specific post, and not your blog. This will be open for a week, so you’ve got plenty of time to add your post!

Have fun!

Monday, June 27, 2011

Learning to sew…again

Hello there! Hope you had a wonderful weekend! We started the Fourth festivities a little early and had a blast – I LOVE this week every year. :)

As you may or may not know…if you have read this blog for two minutes…you know we just got a new sofa in the family room. And it’s created a snowball in the space (and the rest of the house, but more on that later) – but it’s the kind of snowball I LOVE.

It’s the “this part is soooo much better so now that needs to be addressed” effect. I know you know what I’m sayin’. If you’re like me anyway. Which many of you are. (I’m sorry.)

One of my favorite parts of the new sofa – it’s deep. Plenty of booty space. And almost as important – plenty of pillow space. I’m a chick, what can I say? I love me some pillows.

My pet peeve with our last sofa was that the pillows ended up on the floor every. single. time. the Bub and hubby would sit down. (Can someone please tell me WHY this phenomenon occurs?)

But now there’s plenty of room for tush and pillows, so I’m one happy Momma.

I wanted to find a couple new pillows that worked with the ones we already had and our rug:

image

(You can see more on my FAQ page about the rug!)

I was at the “fancy” mall for a bit this weekend and checked into Pottery Barn. They had this striped cover on clearance:

image

And I brought it home but it was too bland. It was super cute but too much red with our other pillows.

I checked out Target and found this cutie:

target brown and blue pillow

The opposite side was blue, which worked great with the rug, but it was just too graphic for what I wanted.

And what I really wanted was something with blue, red, cream and a bit of green like our rug.

Next to impossible. So I decided it was time.

Time to make my own. (Dun dun duuuuun.) I knew if I looked at the fabric store I’d find something perfect if I would just be willing to sew them myself.

But I kept hesitating. I haven’t sewn anything in about two years. Mostly because the sewing machine I had was an itty bitty Shark sewing machine:

shark mini sewing machine

It worked pretty darn well for years…I sewed a few pillows with it and even a set of drapes. And it was supa cheap – you can find it Overstock here for only $20.

But it was SO small, and hemming tape was SO easy. :)

For a while I’ve been realizing the endless possibilities that I’m missing out on by not sewing…or at least learning to sew better. I’ve got the most basic skills when in comes to this – all from Home Ec in the 7th grade. ;)

So a few months ago I got a new, slightly larger sewing machine. It’s still not a full size, but it’s much bigger than my old one and has a ton more options.

But it sat in the closet for months. Taunting me:

pixie plus

The whole relearning thing was intimidating me.

But when I walked into Joann’s and found the PERFECT fabric for family room pillows, I knew I had to bust it out.

And I was so pleasantly surprised – I basically pulled it out, plugged it in and started sewing. It was all ready to go and the sewing part came right back to me!

With just a bit of measuring and a little time (and I mean little, they went fast) I made a couple of pillow covers for the new sofa:

waverly blue red green stripe

Told you the fabric was perfect – blue, red, cream and a tiny bit of green! It’s so fun and fresh for summer too! (I’ve got some drywall patching and painting to finish up before I can show you the whole space.)

The fabric is a Waverly print and I made two pillows with just a little over a yard of fabric – for $12.

GAH. Doing it yourself strikes again – since I used the pillow inserts that came with the sofa, I got two pillows for $12. Score!

I was feeling pretty darn good, so I moved on to the next project that I’ve been meaning to finish forever.

After I finished up the Bub’s big boy room last year, my friend Rebecca emailed me with a photoshopped picture of a cute yellow and white striped pillow on his bed. She thought it would be the perfect finishing touch and she was SO right.

It only took me a year, but I finally got that darn pillow done! I found the perfect striped fabric at IKEA earlier this year. I think it was about $6 for what I needed.

My pillow-making tutorial is not really a tutorial. :) I cheat by folding over the fabric so I have one less side to sew:

IMG_5307

:) I’m going to work it on people. Just give me time.

Then I just sewed a straight line on two sides, and half of the other. The opening is for stuffing the pillow, and I just sewed it up by hand:

It’s not pretty. I don’t care. No one will notice. And if they do, as you know, they get a cookie.

I have yet to hand out a cookie. :)

I love how it turned out!:

yellow and white striped pillow

Seriously cauuute!!

It pulls the yellow out of the sheets and works with the touches of yellow throughout the room:

boy airplane room

FUN! And I did it all by myself – WHOO! Next up, slipcovers!!

Watch out world!

No really, my next goal is just to put zippers in pillows. I’m very excited about this. :)

Now the little sewing machine no longer mocks me…it flutters hearts out at me:

pixie plus sewing machine

Awww…so sweet!

If you are looking to get into sewing, so far I’m REALLY pleased with this little Pixie machine. It came with a ton of supplies as well:

Everything you will need to start out comes with the machine. I’m good on thread for quite some time. Until I try that slipcover. ;)

So, any sewing tips for me? Do you have a machine you love for when I get so good at this that I need to upgrade? (In…a few years.) Did you teach yourself or did you learn as you went?

I’d love to hear!

Tuesday, April 19, 2011

Accidental redo

OK Squeezies. Hang in there with me on this post. I’m going to try to make sense of the way my mind works and the stream of thoughts that go on. Aren’t you so excited to get a look into how my decorating ADD happens? My mind can be a very scary place.  ;)

As I mentioned last week, I’ve started a little redo of our playroom/loft. I can’t even pinpoint when it started, but it’s been in the works for months. I’m just finally getting the projects going.

I’ve told you before, I’m nothing if not efficient. :)

Let’s look back at how the playroom looked for a while:

There was a time when I didn’t care for our wall color (the one I had them paint half the house with) – and I thought I had to match everything to it. Hence the reason I used so much red. (I thought it was the only color that worked with the hue of the paint.)

I’ve grown to love the color, and realize it’s an excellent neutral paint. And it’s opened up my world people! I now know I can use more than red to decorate these rooms! ;)

Anyhoo, remember when I told you back here how I took a couple trips to IKEA in a couple weeks? (Gleee!) Well, the reason for my first trip was to pick out this beauty:

hemnes dresser

It’s the Hemnes dresser and I thought it was going to be perfect for the Bub’s room. I planned to paint it RED (OK, the red isn’t gone for good) to go with his room. Because of that, I got the navy blue version of this dresser, so it would be a good dark base for the red paint.

Well…the reason I loved this dresser was because it had so much storage. What I didn’t realize (even though I measured the space before I got it) was that it’s MASSIVE. I mean, seriously. It’s SO stinking big people.

So I put the MONGO dresser together, and moved it into the Bub’s room, knowing full well it wasn’t going to work. It was too tall and too deep.

Drats.

I was freaking out just a little. What in the world was I going to do with a gigantic navy blue dresser? We certainly don’t need anymore dressers in this house. (You know my dresser obsession.)

And then…it hit me. I could use it in the playroom. Ah HA!! (You can see how I resolved the Bub’s dresser issue here.)

We have had a cheapy laminate TV stand in their for years and years – and a while back I tried painting it. Most of it held up OK, but some parts were flaking off daily:

photo(8)

I’ve been wanting to toss that thing (it was literally falling apart) forever, so I knew this could work out perfectly. Oh yes, my evil plan always comes together…even when I didn’t have a plan to begin with. And it wasn’t evil.

So I crushed the laminate stand (it. was. AWESOME.) and put the new dresser in it’s spot. LOVE.

Even the insides are adorable:

IMG_4072

I changed it up just a bit by adding some fun green knobs (half off!) from Hob Lob:

IMG_4079

The blue and green color is so FUN – and will make even more sense in just a minute. :)

Because the dresser is ginormous, it works insanely well for toys and games. Between another purge and this dresser, all of it is hidden away. And there are even empty drawers:

IMG_4074

Glorious.

Because the dresser was a lot wider than the old TV stand, it created a few more issues. I had to take down the mirror and the art pad off the walls to accommodate the width of this monster.

And doing so left lots of these:

IMG_4050

But we don’t have matching paint to touch them up. And even if we did the wall is about ohhhh…20 feet tall? I’m not painting it, and I don’t know anyone who will. :)

I decided to hang the TV above the dresser, so the need to repaint continued when I went to take the vinyl off the wall:

photo(5)

NICE. What the ??

Good. Ness. See how these things happen? It’s just a tidal wave.

But tidal waves are good around here. They give me an excuse to get creative. And in my mind, creative usually equals putting wood on our walls. Or mdf, in this case. :)

I used about $40 of the good stuff and did another board and batten treatment on that wall:

Oh my, I never tire of how fresh and crisp and classic it is! Nevah!

The height has no rhyme or reason to it – I just wanted to cover the big holes that showed up when I took down the bottom shelves. ;)

I used this method to fill the other holes, painted a couple coats of primer on the wall, installed the mdf and then gave it a coat of primer. I covered everything one more time with glossy white paint.

It gives the large wall a base and grounds it – which is a very good thing in this space:

IMG_4106

By the way, this whole room is still so in between – nothing has been accessorized, so many projects aren’t done. I just couldn’t wait to show ya. :)

Onto the final project (for now), which may have been the first project. I have no idea. It’s all jumbled in my head. Remember that beautiful fabric I used for the kitchen window treatment?

Well this is the space I got it for:

IMG_4086

I wanted to inject some more fun, make it fresh -- but keep it an adult space too. This room has morphed from a playroom to a game room over the past year, and I’m going with it.

And the new fabric was the a beautiful change – still lighthearted, but more grown up at the same time.

I don’t know. All I know is I LOVE it.

A couple weeks ago I found a couple of pillows at HomeGoods that happened to have the exact same colors on them:

IMG_4088

And the Bub loves them because the one side has pirates, and he’s ALL over pirates lately. They a little whimsy in the room.

So far I’m loving the changes – so fun and bright!:

IMG_4096

That new coffee table is for another post – a Craigslist find a few months ago:

table

It’s Pottery Barn and it’s fantastic! And no, it’s not staying red. :)

I love looking back to see how our spaces have changed – here’s the playroom a couple of years ago:

image

And the new game room, as it is today:

IMG_4099

There are so many things left to do – the chairs will be replaced with our family room sofa…when we get a new family room sofa. :) The lights will come down, and my plan is to put built ins on each side of the windows. (Dad? You there?) The gallery wall is coming soon, and I’m figuring out a couple of other changes as well.

For now, I’m so pleased with how it’s coming together! All of the voices in my head are making sense…finally. ;)

P.S. To see a few of my board and batten tricks, go here to watch a short video. :)