Showing posts with label living room and foyer. Show all posts

Thursday, October 27, 2011

Halloween up in here

Ummm…people. It will be NOVEMBER in a mere days. What in the world? Less than two months till Christmas! And I still had my beachy vignette up till today. ;)

The new floors kind of put a wrench in the Halloween decor – most of it has been outside till today. But I finally got a little spooky display going with just days to spare!

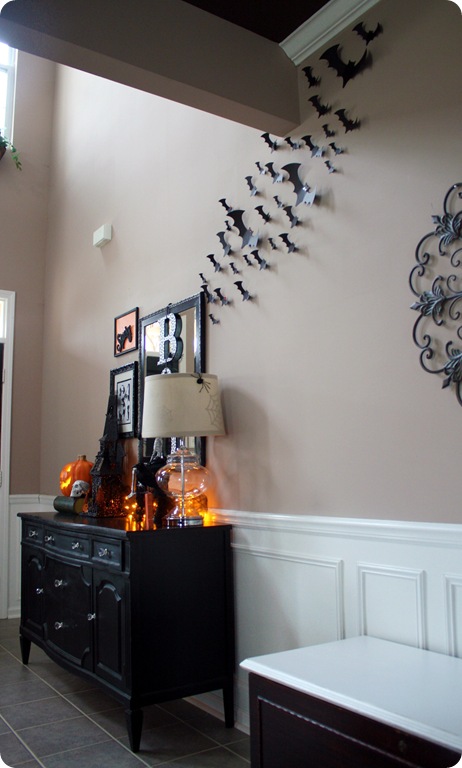
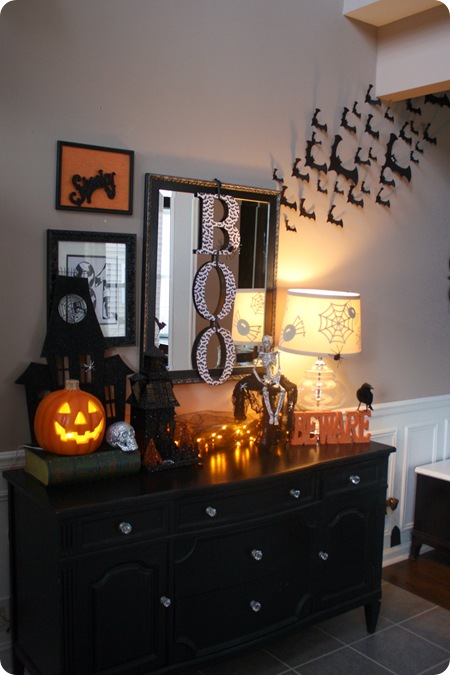
My Craigslist buffet in the foyer was such a great find – and it’s so fun to snazz it up every season. I love having this space to decorate!:

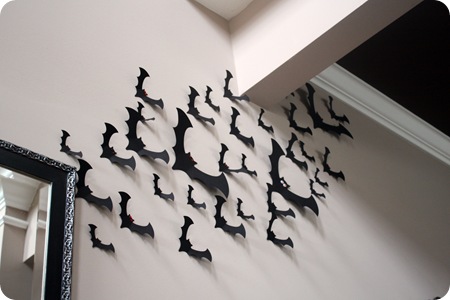
paper bats on wall

I threw this together today – and when I saw threw it together I’m for real. I had about a one spare hour today and was determined to get some Halloween out!

The Bub and I started with the bats:

bat cut outs on wall

Aren’t they AWESOME?!

We sat at the Silhouette machine for a while the other night cutting out meeellions of bats. (OK, so that part was already done. The rest of the throwing together happened today.)

To keep them from getting too serious, we added some googly eyes to some, some red sticky stones to others:

I did something similar last year, but I wanted to go big this year! I just put them up with sticky tacky stuff and made them “fly” up the wall. 

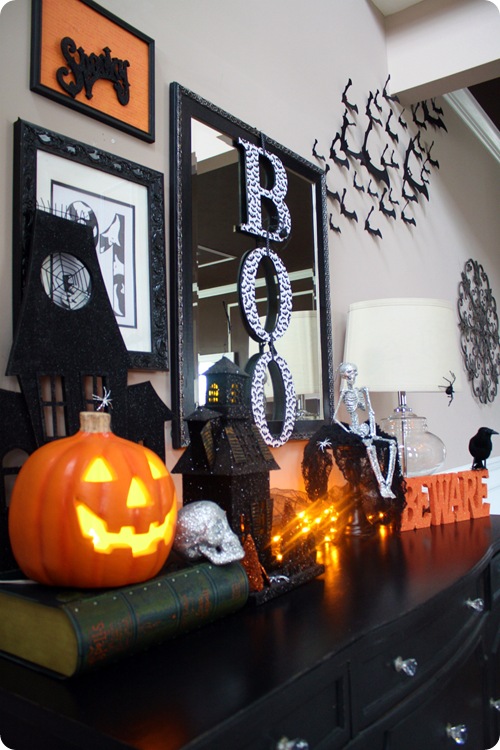
The vignette was put together with (mostly) items we already had, and just a couple new ones:halloween vignette

We found the black Halloween house earlier this season at HomeGoods. Soooo spooky!

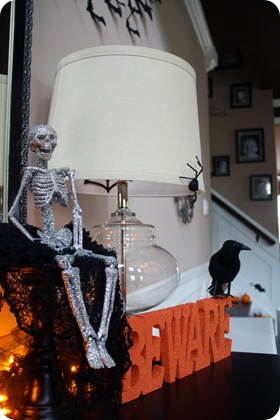
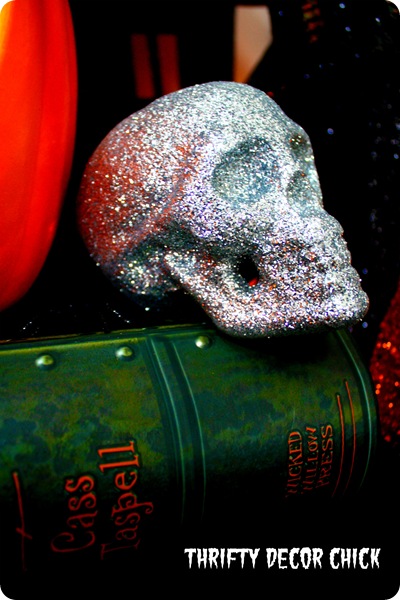
The only other new purchase was the sparkly skeleton that I picked up at Meijer a couple weeks ago (on clearance). I love his bling! And his cute little feet:

 sparkly skeleton

The BOO letters were a craft from a few years ago, and the “art” usually sits on our mantel this time of year:

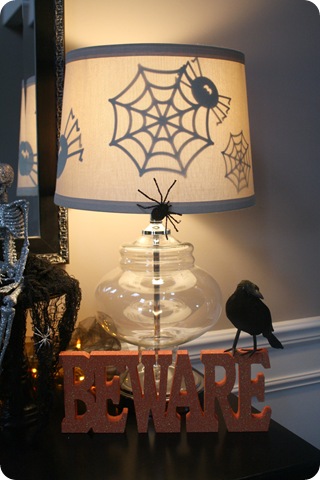
And of course, I had to bring back the little surprise on the lampshade:

halloween lamp shade

The spider webs and spiders are just black paper and I used little dabs of sticky tack to get them to stay up.

All of that adds up to one festive Halloween display!:

I smile every time I look at it, and the Bub is SO happy we finally got some Halloween inside the house. Just in the nick of time!

Do you decorate much for Halloween? Has the time gotten away from you like it has me?

Tuesday, October 18, 2011

Our “new” house!

Well, they are DONE! The floors are down, sanded and stained. It took the guys yesterday and today to get the quarter round down and painted, and then the furniture back in – so I’ve been smiling and fluffing and giddy all evening. ;)

The house is still (mostly) a mess – but I’ve been trying to get the layer of dust out of a couple rooms to show you the results!

I mentioned before that we went with hardwoods finished on site instead of prefinished. (You can go here to see how we came to that decision.) Remember the dark prefinished sample I fell in love with?:

Well, here’s how ours turned out (same spot):

Yes. I went dark. Not crazy dark. Just dark. er. ish.

;)

The stain color is from Minwax and it’s called Jacobean:

minwax jacobean stain

Originally we were going with a walnut, but then the flooring guy said the Jacobean was just a tad deeper and more brown. Because our laminate had a reddish tone that I wasn’t crazy about anymore, I wanted to go as brown as possible.

I know many of you warned about the dark floors showing everything, and believe me I get you. Our laminate floors weren’t super dark, but dark enough. Every single crumb and waft of cat hair showed, so I’m used to it.

What always bugged me more about our laminate was how shiny they were – it looked GREAT when they were clean, but as soon as someone walked across them with bare feet, they were toast.

The crumbs I can deal with –  it was the footprints and smudges that drove me batty! I wanted dark floors, so I knew just what to do to keep the floors from showing everything. I talked to Floor Guy, and we went with a satin polyurethane instead of a gloss:

satin finish on floors

And it worked like a CHARM!! It’s crazy awesome – you can’t see anything on these floors!

I’M SO EXCITED!!!!!!!!!!!!

Really. I can’t tell you how happy this makes me after trying to keep that blasted laminate clean. ;)

It was pouring rain today, so the guys were in and out over and over to bring in the furniture – with wet boots. (They took great care to cover their shoes up till then – there was no way around it when they brought in furniture.) Two guys with wet shoes walked through that spot up there in the pic at least five times, and that’s how it looks. I didn’t even wipe it down.

I'M SO HAPPY!!!!!!!!!!!!!!!!!!!!

:)

A few of you asked about the baseboards during installation, and we did not remove them. The flooring was placed right up against them and then the quarter round covered any gaps:

dark floors white trim

I know some don’t use quarter round, but in order to do that you’d have to take up all of the baseboards, then reinstall them afterwards.

Um...I had enough of a mess on my hands. ;) I like both looks, with or without the quarter round. But I have to say -- when they installed and painted ours, they made the already awesome floors look stunning. It’s the whole contrast thing for me I’m sure. :)

And many of you were passionate about the quarter round matching the baseboards – I SO agree! I didn’t think of that when our laminate was installed and it matched the floors. It made our already wimpy baseboards look even smaller. I’m SO thrilled to have all white!

I love how the boards each have their own natural characteristics. It looks SO LOVELY. I love this board with the little worm holes:

worm holes in flooring

Each piece stained so differently and it gives our house so much character. Some boards are light, some are dark. Some are super smooth, some have some texture. I am SO thrilled with how it turned out. Beyond thrilled. Ecstatic. :)

So how about some before and afters?!

Here’s the living room before:

And now, with the floors down:

jacobean minwax floors

Of course it was raining and cloudy and perfectly awful picture-taking weather today, so my pictures aren’t great. It was hard to get a decent shot of everything.

The transformation in the family room and kitchen isn’t as dramatic, because the laminate was down before:

image

But you can see all the character in the floors now:

The laminate used to stop by our basement steps, and now that everything is hardwood, it makes our main level feet HUGE:

It’s so funny – we feel like we have a brand new house, but it also feels like it’s been like this forever. I don’t even remember the carpet and laminate, already. Well, I do…but the cherry and animal and Christmas tree stains on the carpet and the dirty laminate are oh so easy to put out of my mind. :)

The change has so many new projects running through my head now too – it’s like my mojo was given a jolt! I’ve already completed a few (small) projects and have a few (HUGE) projects in mind.

Now I hope to get some Halloween decor up (the Bub has been SO patient) and then get our house fallified as well. I’ve been holding out on any decor because of this process. I’ll show you more of the floors and my latest projects soon – hopefully with better light!

Thanks for coming along with us during this project!! Everyone told me and I will say it – (now) I don’t mind at all that the old fridge pooped out on us and leaked everywhere. :) NOW I can say that. Seven weeks later. ;)

Wednesday, August 17, 2011

Pottery Barn pillows (on the cheap!)

pottery barn pillows blue yellow

Well hello! Hope you are having a great week! There has been awesome progress on our outdoor project this week, and I’ll show you that very soon! It is SO exciting to watch an ongoing project that I don’t have to complete myself. It’s an odd feeling to not be doing the work…but pretty a cool one. :)

Anyhoo…so I may have mentioned a few times that I’m nutty for the Pottery Barn catalog. I’m pretty much counting the days till the fall version arrives. (There will be some gleeful squeals. Get ready.)

It’s totally free inspiration, as is a trip through the store. ;) The store version is more dangerous though…cause you may or may not find a couple $3 mercury votive holders you MUST. HAVE.

Or something.

Last week I took a trip though to see if they had fall stuff out check out the inspiration, and I ended up at the table linens area. I noticed a few things – first, they were on sale. SCORE. Secondly, they had so many fantastic napkins, in some fabulous colors and combos.

I put a few together to show how they could work together:

 ikat pottery barnpottery barn napkins

Why would you want to combine napkins in different colors in designs you ask?

To make them into pillows of course! I noticed a trend while there – many of their napkins are also versions of their pillows:

So my brain got to thinkin’. And you know that’s dangerous…for Pottery Barn anyway. ;)

I wanted some late summerish, (almost) fallish pillows in our living room, and wanted to break away from the standard reds and browns I’ve always used. I’ve been pulling in blues over the past year and was determined to make the blues work for fall(ish. It’s not fall yet. I know. Ish.).

I have a love/hate relationship with our sofa in that room – it’s OH so comfy, and actually a great, sturdy couch. It’s just the fabric…oh my dear, it drives me NUTS. And the color, it’s as gold as gold can be. I want to recover it but that’s an entirely different post. Altogether. A long one.

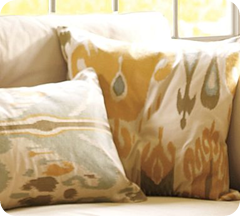
Anyhoo again. I decided to just work with the gold instead of fighting it, and PB had some beautiful yellow and blue combos that I loved! There was an awesome ikat pillow in the store that day:
blue yellow ikat pottery barn

(It was the one on the left but I love both!)

I’ve never been a big ikat girl, and I know it’s trendy, and I’m probably coming in at the end of the trend, and all the sudden I like it. Of course. I’m OK with that. I like what I like, when I like it. Don’t try to make sense of it, your head will hurt. ;)

So I grabbed a couple of napkins and made myself a pillow:

DIY pottery barn

Boom.

Their (embroidered) pillow cover, $59. Mine, I think $8?

I had some fabric for another (upcoming) project, and thought it worked great with the blues in the PB linens. So I made another pillow. LOVE. (I got that blue fabric at Joann’s a couple months ago.)

I found a blue and yellow placemat at PB that day as well, and I knew just what to do with it. I opened the side seam and stuffed it:

pottery barn placemat pillow

Like I’ve shown you here. And a how-to here.

Two Pottery Barn pillows for less than $20 – gotta love it! And I could have made three if I used the ikat napkin on one side and a basic white fabric on the back.

Because I saved so much on those, I splurged on the big blue medallion pillow in the back. I have purchased PB pillow covers before and they hold up GREAT.

But like always, I used a pillow we had to fill it – but it was still a bit wimpy. I hate wimpy pillows. So I stuffed a bed pillow in there:

IMG_6368

I do what it takes. :) It worked great!

And like always…my versions are not for the faint of heart up close. A little rough. So let’s stay far away:

blue and yellow pillows

:)

I’ve been trying to be more adventurous with mixing patterns and colors – the colors in the pillows are in the drapes and I love how they all tie together!

And I love that ikat so darn much I think I’m going to make another one to put on another chair in the room. :)

I have to show you another find for this room! I have wanted to replace our chunky Goodwill coffee table that has been in and out of there:

(Old pic from the red and black days.)

While on a trip to Garden Ridge last week, I found pretty much EXACTLY what I’ve been looking for:

It opens up the space SO much! I LOVE it.

It was $60, but I figure if I sell a couple Craigslist coffee tables (on Craigslist), I’ll make up for that easy. (I've got a couple.)  ;)

I have a few more changes planned for this room, but for now, I’m so happy with how it’s changed over the past year:

The pillows and coffee table have transformed it yet again…for $80. And yet again…I have ensured that Pottery Barn will never advertise on TDC. ;)

You can make pillows out of just about anything – linens, shower curtains, sheets, whatever! The possibilities are endless! Have you made any unconventional pillows? Link to them in the comments if so!
Sunday, July 24, 2011

From Mossy to Beachy

beachy vignette

Well, it’s the end of July and I’ve just finished up my summer vignette in the foyer – welcome to my world. ;)

I’ve had most of it done for umm…weeks. Since May? There was one small detail I’ve been putting off all that time that I FINALLY just finished up. More on that in a smidge.

I don’t think I’ve ever really decorated with anything beach-inspired in our house…like, ever. Until now! It must have been the summer Pottery Barn catalog this year, because all of the sudden I thought that look was just lovely.

And no, we don’t live anywhere near the coast. I don’t care. I do what I want.

It started with a beautiful blue spray paint I picked up at True Value a couple months ago:

IMG_6129

I’ve been adding more and more blue to our home over the past few years, and this is a lovely smoky tone. I sprayed my old Southern Living pedestal with it:

sea shells on platter

It was brown, which was beautiful. I just wanted it to pop and now it does. I can always spray paint it back. ;)

I filled it with decorative stuff – some shells, twine-covered balls and even some rocks from our vacation.

We picked a few pretty rocks at the beach and of course they needed to be included:

IMG_6060

(The writing is for next year when I’m purging and I see the rocks and go,
“What the heck? Rocks? Why do I have rocks?” And toss them.)

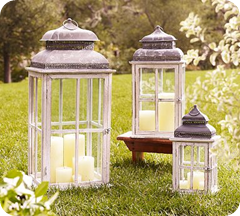
I’ve wanted something LARGE on the buffet in our foyer for a while now, and while at HomeGoods last month, I saw a gigantor wood lantern and it had me at pretty window paned doors:

pottery barn lantern knock off

It is SO close to the Pottery Barn version, by the way:pottery barn window pane

Mine was $20 – there’s is $80. Boo to the YAH.

Yet again, I’m fairly sure Pottery Barn will never become a sponsor at TDC. ;)

I put a trio of white candles inside, and then wrapped some rope I picked up at True Value around them:

white candles rope lantern

LOVE!

The rest of the goodies I already had:  

The lamp used to sit on the sofa table in our kitchen, but I thought it worked so much better in the foyer.

Lately I’m smitten with the fresh look of silver or brushed nickel, so I grabbed some Rub ‘n Buff in a silver color and changed up the raised part of the mirror:

 rub n buff 

I’d love something chunkier up there, but I’m trying to use what I’ve got! The Rub ‘n Buff is so easy to use it’s just silly – and one tube will last you foreveeeeeer. Seriously. A tiny bit goes a very long way.

When all was done, we had a slightly sea-inspired vignette in our foyer:

sea-inspired vignette

And I must say I’m lovin’ it! That lantern rocks my socks off – big fat heart that thing.

Sp you want to know what’s held me up all this time? The one thing I needed to finish up?

I started painting the inside of our front door black the weekend of the back door disaster.

Yes, when we had a hole in our house, I did what any smart person would do. I started painting another door. :) I think I was trying to redeem myself…either that or I have some serious addiction to painting doors black. I don’t know, I just went for it.

I did a coat of grey primer and a coat of black and then it sat…and sat. For all this time. Till this weekend:

black interior door

I love it, I knew I would. I used my Behr Black Suede paint in an eggshell finish and I’m pretty much obsessed with how it turned out.

Here’s a comparison, with a way before photo:

black interior door

I know some like a shiny, high gloss door, but I only like shiny on my molding. ;) So the eggshell finish I already had worked out great. It’s taken three coats so far -- I actually need to do one more, but for now I’m calling it done.

I’m just happy to have the painters tape off the door for the first time since the first week of June. :)

No, I’m not painting the trim, at least for now. I’m lucky this got done in 2011 people.

So, are you a decorating with seashells kind of person? Don’t worry, the beach police won’t come find you if you’re name isn’t Sally and you don’t live near the seashore. ;) You can incorporate it all you want – it is your house.

Do what you want!!

**Cassity’s black door project encouraged me to start painting our front door black, and Shelley’s got my booty moving to finish it!


I was one of the bloggers selected by True Value to work on the DIY Squad. I have been compensated for my time commitment to the program as well as my writing about my experience. I have also been compensated for the materials needed for my DIY project. However, my opinions are entirely my own and I have not been paid to publish positive comments.

Tuesday, March 29, 2011

A mossy vignette

Well, if spring isn’t going to show up, I’m going to WILL it here. I’m planting my herbs tomorrow (inside), I’ve refused to wear my coat for the past few days and gosh DARN IT, I am decorating for it.

And if you decorate for it, it will come. That’s my hope anyway. :)

I wanted to spring bling out our foyer and the first project was an easy one. The inspiration came from Pottery Barn:

image

Are you surprised??

Their mossy letters are about 20 inches tall and run about $80 each.

SHUT. UP.

Yowza.

Mine is 23 inches tall and cost me $7. Awww to the YEAH.

I already had one big part of this one project, so that helped the cost a bit. I made a fluffy green Christmas monogram a few years ago:

image

I unraveled the garland and used the honkin’ letter to create my new spring masterpiece:

You can get these cardboard letters in various sizes at Joann’s – I got mine years ago with a coupon so it was only $5.

For this project, I got a huge sheet of mossy stuff:

I got this at Joann’s as well – it was $15 but I had a 40 percent off coupon, and then another 25 percent off my whole purchase. Saawheet.

I used hot glue to adhere the moss to the letter, and kind of cut out the moss as I went. On the curves I cut it so it would fit against the sides flush:

I cut out little triangle shapes to make it lay flat, so I used those to fill it all in later. (You can’t even tell where I glued them on.) Then I trimmed it up and it was done!

Two things if you try this – the hot glue will bleed through the moss sheet, so watch your fingers! For reals. Yikes. And wow – just. WOW. This project is messy:

Thank you Mr. Dyson.

The mess was worth it though -- it turned out just as I had hoped!:

diy mossy letter

I hung it over the mirror, (with hot glue again) but it would also look fantastic on a front door! Because I was too lazy didn’t want to do the back, you could see it was unfinished when I hung it. I used some of that sticky gummy stuff (that you use to hang posters) to hold it to the mirror:

6b7f19

Ahh yes, much better.

I finished off the buffet by working (mostly) with items I already had. My friend Missy was so sweet and sent me some mossy rocks from the Dollar Tree:

mossy rocks

I couldn’t find them at our stores and was thrilled when she found some for me!

I added a few to my iron candleholder from a recent thrifting trip:

I put a nest where the candle should go and perched a little bird inside.

Pretty bird. Yeah, pretty bird. (Name that movie!) :)

I put another nest (you’ll see this is a trend) under a small cloche and called it done for that side:

pottery barn mossy letter

For the other side of the buffet, I used some Spanish moss under a cloche and nestled a small basket with eggs inside:

spanish moss

I am LOVING that Spanish moss! I’ve never used it before and it’s just beautiful. The little basket was a Pottery Barn splurge a couple of months ago – for $6. :)

I put some craft paper through our shredder to create another nest of sorts in an apothecary jar:

craft paper nest

Hello?? Cauute and free!

The largest apothecary jar is filled with more Spanish moss, a small nest and more eggs:

spring apothecary jars

ALL of these eggs were $4 at Joann’s last weekend!

My only purchases for this little vignette were the sheet of moss and the eggs:

I tried placing the three glass pieces on the left on a tray at first, but found I liked the simpler look of the glass on the black buffet:

spring vignette

I love it! Good thing too, cause knowing me, the eggs will still be out in July. :)

I was going for a springy moss look mixed with some glass sophistication:

All done in about an hour and with $10 of (new) supplies. Me likey.

Have you pulled out any spring decor yet? I don’t do much, but you really can’t go wrong with nests, eggs, some green stuff and a bird or two thrown in. ;)

I’m linking this up to my friend Kate’s spring party! (Late to the party as always.)

Thanks for all the great comments on my solution for our paper clutter! You can still enter to win the Sentry Safe here till Friday!